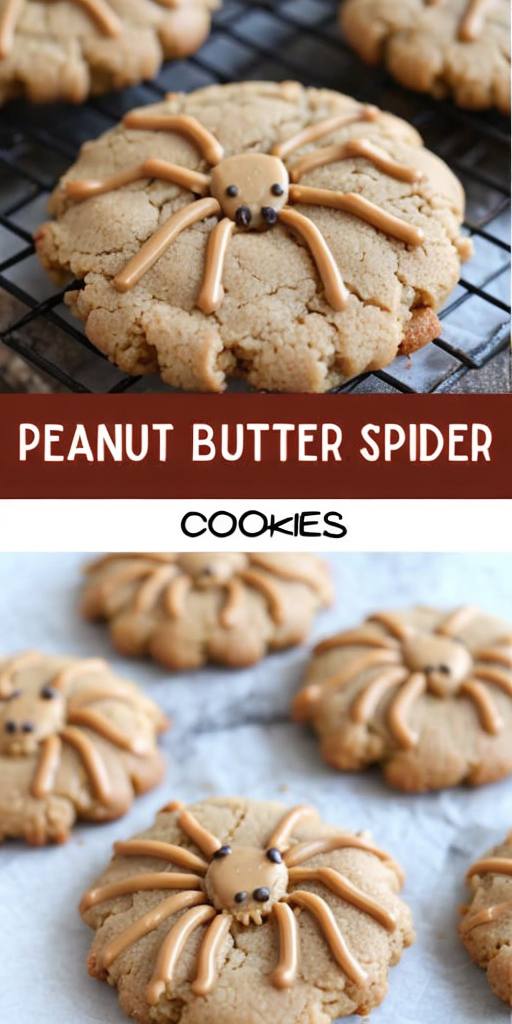
Easy Peanut Butter Spider Cookies – Ready in 30 Minutes
Looking for a fun and festive Halloween treat? These Easy Peanut Butter Spider Cookies are not only adorable but also incredibly delicious. With their rich peanut butter flavor and charming chocolate spider decorations, they’re sure to be a hit at your next gathering. Even better, you can whip them up in just 30 minutes, making them a perfect option for both planned and last-minute baking adventures.
The rich aroma of freshly baked cookies fills the air as you prepare these peanut butter spider cookies. The flavor is a delightful balance of nuttiness and mild sweetness, making them a truly indulgent treat. Paired with the fun and spooky spider design, these cookies are a perfect edible centerpiece for any Halloween table.
Quick Recipe Highlights
- Flavor Profile: Delightfully nutty, with the creamy richness of peanut butter paired with the sweetness of chocolate.
- Texture: Crispy on the outside with a soft, chewy center that melts in your mouth.
- Aroma: Inviting scent of freshly baked peanut butter, with hints of chocolate that awaken the senses.
- Visual Appeal: Eye-catching with intricate spider designs that captivate both children and adults.
- Skill Level Needed: Perfect for beginners who want to impress without stress; basic baking skills required.
- Special Equipment: Simple tools needed, such as a baking sheet and an icing bag for precision.
Recipe Overview
- Difficulty Level: These cookies are easy to prepare, making them ideal for bakers of all levels, including kids enjoying a fun kitchen activity.
- Category: Ideal as a dessert or a sweet snack, perfectly aligning with festive themes.
- Cuisine: A modern American classic with festive Halloween influences.
- Cost: Relatively low-cost ingredients, making them an economical option for parties or family treats.
- Season: Perfect for the fall season, especially October, blending autumnal flavors with Halloween excitement.
- Occasion: Halloween parties, autumn gatherings, or whenever a fun and themed dessert is desired.
Why You’ll Love This Recipe
The taste of these peanut butter spider cookies is a perfect harmony of sweet and nutty, with the creamy peanut butter providing a comforting depth. The slight crunch enhances the eating experience, making each bite a pleasure. Convenience is key with these cookies; you only need 30 minutes from start to finish, making them perfect for busy schedules. Nutritionally, they offer the benefits of peanuts, powerhouse nuts rich in protein and healthy fats. These spider cookies are a delightful conversation starter and entertaining centerpiece for any Halloween-themed gathering. Their cost-effectiveness means you can enjoy indulgence without breaking the bank, while accessibility to ingredients ensures you’ll find everything you need at your local grocery.
Historical Background and Cultural Significance
Peanut butter cookies have a storied history in American cuisine, dating back to the early 1900s when George Washington Carver promoted the use of peanuts in a variety of dishes. These cookies not only embody culinary nostalgia but also serve as a creative canvas for seasonal themes. The evolution of the cookie into a Halloween favorite showcases how cultural trends influence baking traditions. Regional variations span across the U.S., with adaptations adopting various embellishments and flavors to reflect local tastes and festivities.
Ingredient Deep Dive
Peanut butter, the star ingredient, offers a rich culinary and nutritional legacy. Associated with the American South, it’s evolved from a staple crop to a beloved kitchen essential. Peanuts provide heart-healthy monounsaturated fats and protein, making them a nutritious choice. To select the best peanut butter, opt for smooth varieties for ease of mixing, ensuring freshness by storing jars in a cool, dark place. For substitutions, almond or cashew butter can offer a different, yet delightful twist.
Chocolate chips, used for decorating, bring a sweet contrast and aesthetic appeal to the cookies. Derived from cacao beans, chocolate’s ancient roots date back to Mesoamerican cultures where it was revered as a ‘food of the gods.’ Nutritionally, dark chocolate contains antioxidants beneficial for heart health. Opt for semi-sweet chips for the perfect balance of sweetness, and store them in a cool, dry place to maintain quality. If needed, you can substitute with milk chocolate or white chocolate chips for variation.
Common Mistakes to Avoid
- Overmixing the dough: This can lead to dense, tough cookies. Mix until ingredients are just combined.
- Skipping the chilling step: Chilling helps cookies hold their shape during baking.
- Using cold baking sheets: Ensure sheets are at room temperature to prevent uneven baking.
- Inaccurate measurements: Use a kitchen scale for precision, especially with flour and sugar.
- Not preheating the oven: This can cause uneven baking results.
- Using natural peanut butter: Stick to regular for consistent texture and binding.
- Forgetting to flatten cookies: Use a fork to press them down; this is crucial for even baking.
- Wrong chocolate choice: Use baking chocolate chips for stability during melting.
Essential Techniques
Creaming the butter and sugar is crucial for structured cookies. It aerates the mixture, creating light and soft cookies. Master this technique by using room-temperature butter and mixing at medium speed until light and fluffy, looking for a pale yellow color as a visual cue. Avoid common pitfalls, such as using cold butter, which won’t aerate properly or over-creaming, which can lead to flat cookies.
Pro Tips for Perfect Peanut Butter Spider Cookies
Ensure all ingredients are at room temperature before beginning, which aids in smoother mixing. For an extra flavor boost, add a teaspoon of vanilla extract to the dough. To achieve the ideal spider web design, consider using a toothpick to gently swirl melted chocolate on top of the cookies. If time allows, chill the dough for extra five minutes to help maintain shape during baking. Always use parchment paper on baking sheets to prevent sticking and ensure even cooking. Store cookies in an airtight container to retain freshness and chewiness for up to one week.
Variations and Adaptations
Regional variations can include adding spices like cinnamon or nutmeg for an autumnal twist. Seasonal adaptations could embrace peppermint or orange zest during winter holidays. For dietary modifications, consider using gluten-free flour blends, ensuring the baking powder and soda are gluten-free certified. Flavor variations might see the inclusion of crushed pretzels for a salty sweet contrast. To alter texture, incorporate oats into the dough for a heartier cookie, striking a playful balance between a traditional oatmeal cookie and its peanut butter counterpart. For a sophisticated presentation, drizzle white chocolate over the cookies instead of creating spider designs, giving them a refined look suitable for more formal occasions.
Serving and Presentation Guide
The art of plating these cookies can dramatically enhance their aesthetic appeal. Arrange them on a rustic wooden board, garnished with finely crushed peanuts for textural contrast. Garnishing ideas include sprigs of fresh mint or dusting of cocoa powder to enhance visual touch. Traditional accompaniments like a glass of milk or cup of coffee can elevate the cookie’s enjoyment factor. For modern influence, consider serving them with a small bowl of vanilla ice cream or a warm caramel dipping sauce. Ensure the cookies are served at room temperature to maintain optimal flavor and texture; portion control tips include serving in pairs, balanced by smaller accompanying servings.
Wine and Beverage Pairing
For an adult twist, pair these cookies with port wine, whose sweetness complements the nuttiness of the peanut butter. Non-alcoholic alternatives include a rich hot chocolate or a frothy cappuccino, both enhancing the cookie’s cozy appeal. For a tea pairing, a chai latte offers warm spices that beautifully harmonize with the sweet and savory flavor profile. Consider serving hot beverages as their warmth contrasts with the cookie’s chewy texture, offering an enriched sensory experience.
Storage and Shelf Life
Proper storage ensures your cookies remain fresh and flavorful. Store them in an airtight container at room temperature, where they can last for up to seven days. Avoid refrigeration, as this can make them hard and alter their texture. Use clear glass containers to easily spot any spoilage signs like moisture accumulation. For reheating, a brief microwave stint of 10-15 seconds rejuvenates their softness. If freezing, separate layers with parchment paper to avoid sticking, ensuring long-term freshness for up to three months.
Make Ahead Strategies
Advance planning with these cookies ensures smooth execution on event day. Prepare the dough up to two days ahead, chilling it in the fridge until ready to bake. Once baked, store them in an airtight container but if decorating closer to serving time, keep decorations separate to maintain their structure and appeal. Assembly involves gentle reheating just before the event to enhance their fresh-baked feel, while strategic placement on eye-catching platters creates an inviting display.
Scaling Instructions
These cookies can easily be scaled according to your needs. Halve the recipe for a smaller batch or double it when serving a large crowd, keeping an eye on baking time as oven load may require slight adjustments. Ensure mixing bowls and baking sheets are adequately sized for larger batches to prevent overflow and uneven baking. Adjust timing by monitoring color rather than exact minutes, as crowded batches may require slightly longer. When scaling, remember storage becomes crucial to maintain freshness over extended timeframes.
Nutritional Deep Dive
These cookies balance macro needs with fat, protein, and carbohydrates derived from peanut butter and sugar. Micronutrient-wise, they offer essential minerals such as magnesium and zinc. With each serving, enjoy moderate protein alongside healthy fats from peanuts, which can help in satiety. Portion analysis reveals each cookie contributes to daily energy requirements without overconsumption. As a delightful treat, they complement a balanced diet when enjoyed in moderation, aligning with weight management goals by satisfying sweet cravings in small doses.
Dietary Adaptations
For gluten-free adaptations, select certified gluten-free oats and flour options. To achieve a dairy-free version, replace butter with plant-based margarine or coconut oil, ensuring similar fat content. A vegan option requires replacing eggs with flaxseed or chia seed gel, while sugar substitutions like coconut sugar offer lower glycemic alternatives. For low-carb or keto enthusiasts, consider erythritol-based sweeteners and almond flour for impressive results. Paleo adjustments may call for almond butter swaps, while a low-FODMAP version involves using specific sweeteners to maintain digestive comfort.
The Recipe
Easy Peanut Butter Spider Cookies
Serves: 24 cookies
Prep Time: 15 mins
Cook Time: 10 mins
Total Time: 30 mins
Kitchen Equipment Needed
- Baking sheet
- Mixing bowls
- Electric mixer
- Spatula
- Icing bag or plastic bag with a snip
Ingredients
- 1 cup creamy peanut butter
- 1/2 cup granulated sugar
- 1/2 cup brown sugar, packed
- 1 large egg
- 1 tsp vanilla extract
- 1 tsp baking soda
- 1/4 tsp salt
- 24 milk chocolate chips
- 24 chocolate candy-coated sunflower seeds
Directions
- Preheat the oven to 350°F (175°C) and line a baking sheet with parchment paper.
- In a large bowl, combine peanut butter, granulated sugar, and brown sugar until smooth and creamy.
- Add the egg and vanilla extract, mixing well to combine.
- Stir in baking soda and salt until a smooth dough forms.
- Roll walnut-sized balls of dough and place them onto the prepared baking sheet, leaving space between each cookie.
- Flatten each cookie slightly using a fork in a criss-cross pattern.
- Bake in the preheated oven for 10 minutes or until golden on the edges.
- Remove from the oven and immediately press one chocolate chip into the center of each cookie to form the spider body.
- Place sunflower seeds around the chocolate chip to create spider legs.
- Allow cookies to cool completely on a wire rack before serving.
Recipe Notes
- Chocolate decorating tip: Use a piping bag for precision drawing if desired.
- For thicker cookies, refrigerate the dough for about 30 minutes before baking.
- Customization: Add a sprinkle of sea salt for a delightful flavor contrast.
Troubleshooting Guide
For texture issues, if cookies are too hard, adjust the baking time. If too soft, allow additional bake time or let them cool fully to set. Balanced flavor might require additional sweetness if sugars are reduced. Should temperature issues arise, always verify oven calibration. Overly sticky dough can result from under-chilling or warm kitchen conditions; chilling helps solidify batter. Ingredient substitutions require similar consistencies; adjust flour or liquid levels to maintain proportions. Timing concerns often resolve by monitoring color and smell post-bake.
Recipe Success Stories
The community delights in sharing their twists on these spider cookies. Feedback highlights includes nut-free versions using sunflower seed butter, applauded by readers for keeping allergenic concerns at bay. Many variations replace milk chocolate chips with dark for an enhanced bitter contrast, well-received at adult gatherings. Suggestions like flavored sunflower seeds cater visual play and additional taste notes that diversify the recipe’s impact. Photography enthusiasts offer tips on capturing perfect bites, ensuring social shares truly showcase their enticing nature.
Frequently Asked Questions
Can I make the cookies ahead of time?
Yes, you can prepare the dough a day in advance and refrigerate. This helps intensify flavors and makes baking day more relaxed.
What can I use if I can’t eat peanuts?
Sunflower seed butter is a fantastic substitute, providing a similar texture and taste without peanuts.
How do I ensure my cookies are chewy?
Keeping an eye on bake time—removing the cookies when just set—ensures a chewy texture once cooled.
Why did my cookies spread too much?
The likely culprit is warm baking sheets; cooling them between batches minimizes spread.
Can I double the recipe?
Absolutely, but pay attention to mixing times and ensure bowls and sheets accommodate larger quantities.
Is it necessary to use parchment paper?
While not mandatory, parchment paper minimizes sticking and eases cleanup, contributing to even cooking.
Can I freeze baked cookies?
Yes, they can be frozen for up to three months when stored in airtight containers. Thaw at room temperature before serving.
What’s a healthy substitute for sugar?
Coconut sugar or a monk fruit sweetener creates a healthier alternative while maintaining sweetness.
How do I adjust the flavors for adults?
Incorporate bold flavors like espresso powder or a hint of chili to intrigue adult palates with depth and a touch of heat.
Which type of chocolate is best?
Semi-sweet chocolate provides the ideal balance of sweetness and cocoa taste, but adjust to preference with milk or dark varieties.
Additional Resources
For those who love exploring culinary creativity, related recipes like Classic Chocolate Chip Cookies or Oatmeal Raisin Delights offer timeless enjoyment. Technique guides on achieving perfect consistency through variable creamings or batter chillings help refine skillsets. Ingredient information delves into nutritional benefits, supporting informed food choices. Equipment recommendations spotlight essentials and enhancements to everyday kitchen tasks, making preparation both efficient and enjoyable. Seasonal variations highlight bold flavors and festive themes across your baking calendar.
Join the Conversation
Get involved with our vibrant baking community by sharing your recipe creations on social media tags like #[CookieNameChallenge]. Instagram showcases enticing shots; capture your kitchens’ aromatic playfulness or displays. Writing a review boosts recipe credibility, helping others recreate success in their home comfort. Engage in discussions on adaptations and authenticity in themed baking, growing collective knowledge and recipe breadth. As you explore diverse methods, leave thoughtful advice to benefit fellow bakers and inspire future endeavors in this sweet culinary journey.