


Perfect All Butter Pie Crust – Ready in 30 Minutes: The Ultimate Guide
Creating the perfect all butter pie crust in just 30 minutes is an art that combines simplicity with delectable flavor. Whether you’re a seasoned baker or a beginner, this pie crust recipe promises a deliciously flaky and buttery base that will elevate any pie. The aroma of fresh baking wafting through your kitchen is enough to make anyone’s day brighter. This all butter pie crust is not only quick to make but also adds a rich texture and flavor that pairs beautifully with any filling you choose.
The secret to a perfect crust lies in the quality of the butter used. Using unsalted, high-fat butter ensures maximum flavor and flakiness. As you prepare to embark on your baking journey, imagine the warm, golden crust enveloping your favorite pie filling, crafted perfectly to suit any occasion. Stay tuned to explore every aspect of this delightful pie crust recipe, from its historical roots to pro tips for mastering the perfect bake.
Quick Recipe Highlights
- Flavor Profile: The pie crust boasts a rich, buttery taste with a hint of saltiness that enhances the overall flavor of your pie without overpowering it.
- Texture: Expect a light and flaky texture that offers a satisfying crunch, providing the perfect contrast to smooth or creamy pie fillings.
- Aroma: As it bakes, the pie crust releases a deliciously inviting buttery aroma that fills your kitchen with warmth and comfort.
- Visual Appeal: A beautifully golden crust with slight bubbling on the edges, inviting you to dig in.
- Skill Level Needed: This recipe is beginner-friendly, requiring only basic baking skills and tools.
- Special Equipment: A rolling pin and pie dish are essential, with a food processor as an optional helper for mixing the dough efficiently.
Recipe Overview
- Difficulty Level: This pie crust is designed to be foolproof, making it suitable even for novice bakers. With clear instructions and a short preparation time, you’ll have the confidence to create a crust that rivals professional patisseries.
- Category: This crust serves as the perfect base for any dessert and can be adapted for savory pies by adjusting the salt content.
- Cuisine: Rooted in classic French pastry techniques, this recipe offers a staple component in many Western dishes, proving timeless across cultures.
- Cost: With simple ingredients like flour, butter, and salt, this recipe remains cost-effective while promising a high-quality outcome.
- Season: Ideal for all-year-round baking, especially during holiday seasons when homemade pies become the highlight of any dessert table.
- Occasion: Perfect for family gatherings, festive dinners, or as the base for everyday desserts or special celebrations.
Why You’ll Love This Recipe
The taste and texture of this all butter pie crust are simply exceptional. Every bite offers a symphony of rich, buttery notes intertwined with a perfectly flaky texture. It’s the kind of crust that complements a vast array of fillings, from sweet to savory. Whether filled with fresh fruits or decadent creams, this crust is the ideal canvas to make your pies shine.
Convenience is a key feature of this recipe, taking only 30 minutes from start to finish. The recipe is straightforward, with few ingredients, making it a perfect choice whether you’re in a rush or looking for a quick baking adventure. With minimal preparation and cleanup, it’s an easy way to make an impressive homemade pie crust without sacrificing quality.
Nutritionally, using high-quality butter provides a good source of fat while eliminating additives found in pre-made crusts. The freshness of homemade dough means you’re in control of what goes into your crust, allowing for healthier substitutions if desired. For those conscious about ingredients, this crust aligns with cleaner eating principles.
Socially, serving a pie with homemade crust is a wonderful way to engage with your guests. Sharing a homemade pastry creates a warm, inviting atmosphere and offers the perfect opportunity for connection at gatherings. Seeing your guests enjoy the fruits of your labor is deeply rewarding and fosters a sense of joy and celebration.
Finally, the cost-effectiveness and accessibility of this recipe are undeniable. With common pantry ingredients like butter and flour, you’re able to create a luxurious pie crust without the high price tag of store-bought alternatives. This recipe offers a budget-friendly solution with gourmet results, proving you don’t need to spend a fortune to create something truly exceptional.
Historical Background and Cultural Significance
The concept of pie is deeply rooted in culinary history, with the earliest iterations dating back to ancient Egypt. Originally, pie crusts were used as a vessel to encase various fillings and preserve food. As the recipe traveled across cultures and centuries, it evolved to become a beloved element of Western cuisine, particularly in British and American traditions.
Pie crusts have held significant cultural importance as a comfort food staple across generations. In the 16th century, the English began refining pie crust recipes, transforming them from purely utilitarian purposes to elements of culinary finesse. They adapted the dough to be more tender and flavorful, laying the groundwork for the modern pie crust we cherish today.
Over the years, this humble crust has become a canvas for regional variations, reflecting local culinary traditions and tastes. In France, the pâte brisée emerged as a finely crafted version that emphasized a buttery flavor, which heavily influences many modern recipes, including our all butter pie crust.
The significance of pie crusts extends beyond just food; they symbolize homeliness and tradition, particularly in American culture. Pies are quintessential in holidays like Thanksgiving and Christmas, where making a pie crust from scratch evokes a sense of family legacy and warmth. Sharing a homemade pie is akin to sharing a piece of history and tradition, connecting past and present through a timeless culinary craft.
Ingredient Deep Dive
Butter serves as the backbone of our all butter pie crust, offering unparalleled flavor and flakiness. Originating from ancient agricultural communities, butter has been celebrated for centuries as a luxurious ingredient. In pie crusts, its high-fat content ensures a tender texture when baked. It’s crucial to select unsalted butter to have precise control over the seasoning in your crust. For storage, keep butter refrigerated and buy in small batches to ensure freshness. If needed, high-quality margarine or plant-based butter can serve as substitutes for dietary preferences.
Flour provides structure to the pie crust, making it an essential component. All-purpose flour is versatile and accessible, giving the crust a balanced texture. Flour’s history is as old as agriculture itself, binding ingredients in countless recipes globally. To achieve the best results, sift the flour before use to avoid clumps. Store flour in an airtight container to maintain freshness and prevent pest infestation. Alternatives such as whole wheat or gluten-free flour blends can also be used, depending on dietary needs.
Common Mistakes to Avoid
- Overworking the Dough: Handling the dough too much can result in a tough crust. Mix just until ingredients are combined to maintain a tender texture.
- Using Warm Butter: Ensure your butter is cold to achieve the flakiness desired in a pie crust. Warm butter will lead to a greasy and dense crust.
- Skipping Rest Time: Let the dough rest in the refrigerator to relax the gluten, preventing shrinkage during baking.
- Not Pre-baking: For some pie fillings, pre-baking the crust (blind baking) ensures it cooks through without becoming soggy.
- Incorrect Rolling Technique: Roll from the center outwards gently to maintain an even thickness throughout.
- Skipping Docking: Docking (pricking with a fork) the crust helps prevent bubbling during baking, keeping it flat and even.
- Overbaking: Keep an eye on the crust to ensure it reaches a golden hue without burning, striking the perfect balance of cooked and tender.
- Misjudging Thickness: Ensure your crust is not too thin, which can cause it to break, or too thick, making it hard or chewy when baked.
Essential Techniques
Mastering the butter cutting technique is crucial for a flaky crust. This involves cutting butter into small pieces and incorporating it into the flour until pea-sized clumps form. These clumps melt during baking to create pockets of steam, lending the crust its flakiness. Using a pastry cutter or fork can help achieve this without warming the butter, which is vital for texture.
Chilling the dough is an underrated step that carries substantial impacts. Allowing the dough to chill after mixing helps the gluten relax, preventing shrinking and making it easier to roll out. It also firms the butter, which maintains flakiness during baking. The visual cue of firm yet pliable dough indicates readiness for rolling.
Blind baking, or pre-baking the crust, is essential for pies with unbaked fillings. This technique involves baking the crust with pie weights to set its shape and ensure it stays crisp. The pitfall here is skipping docking, as pricking the base helps prevent puffing, and a pale crust gives away insufficiency.
Pro Tips for Perfect All Butter Pie Crust
Keep your ingredients cool at all times. Starting with chilled butter and cold water ensures your crust maintains its coveted flakiness and doesn’t become greasy through the mixing process.
Using a food processor to mix the dough minimizes the heat from your hands, facilitating a fast and even distribution of ingredients without overworking the dough.
Add a tablespoon of vinegar or vodka alongside cold water to keep the dough tender by limiting gluten formation. This trick helps avoid a tough crust and develops a melt-in-the-mouth texture.
Flour your work surface and rolling pin generously before rolling out the dough to prevent sticking, allowing for smooth, clean motions.
Roll out the dough between sheets of parchment paper to ease transferring it into the pie dish, preventing any tears or stretching that could affect the crust’s integrity.
Consider an egg wash or milk brush for added golden color during baking. It enhances the aesthetic appeal without impacting the flavor significantly.
If in doubt, your nose is a great guide. The dough should smell fresh with no off or sour odors indicating spoilage. Trust your senses when ensuring ingredient freshness.
Variations and Adaptations
Regional variations of the pie crust often reflect local ingredients and traditions. In the American South, adding a touch of lard to the butter mixture creates an incredibly tender crust known for its earthy flavor. Consider substituting part of the butter with lard for an authentic Southern twist.
Seasonal adaptations include adding spices like cinnamon or nutmeg to the crust mixture when making fall pies. This small addition infuses warmth and complements seasonal fillings like apple or pumpkin.
For those following dietary modifications, creating a gluten-free version is possible by using a gluten-free flour blend designed for baking. Ensure that the butter used is also labeled gluten-free to meet all dietary conditions.
Enhance flavors by incorporating herbs like rosemary or thyme into the dough for savory pies, offering a fragrant crust that augments fillings like cheese or mushrooms with an earthy profile.
Alter the texture by incorporating grated cheese into the dough before baking, creating a savory, cheesy variation ideal for quiches or galettes, adding richness and complexity.
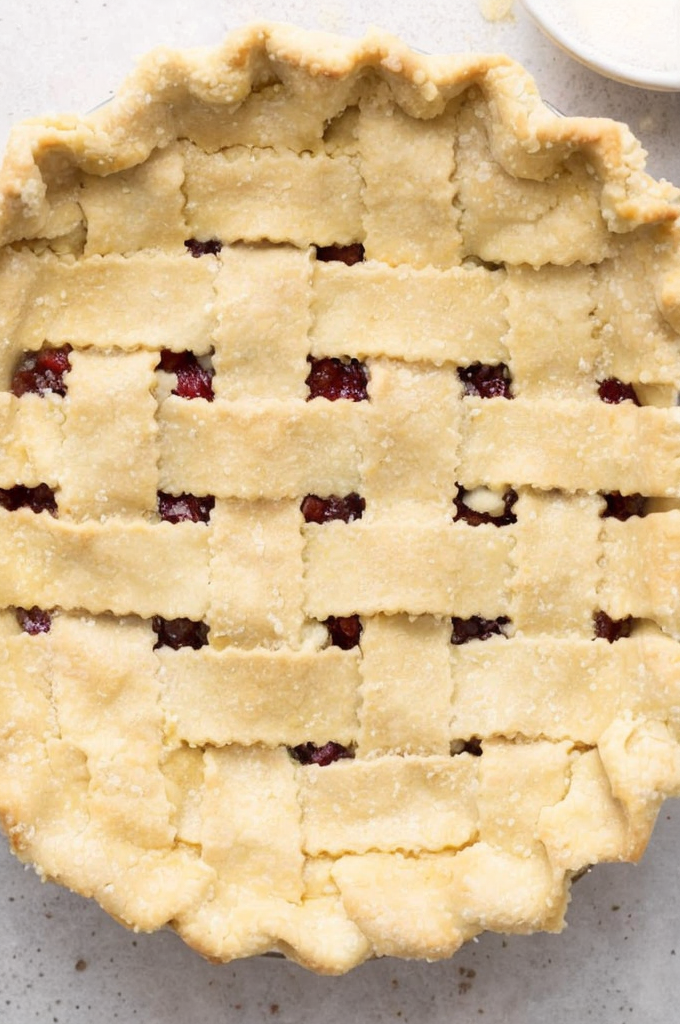
Boost visual appeal by weaving a lattice top from pie dough strips, providing a stunning presentation for fruit pies. Such a design is simple to execute and elevates the overall dessert presentation with its elegant yet rustic charm.
Serving and Presentation Guide
Master the art of pie crust presentation with these serving tips. For a classic look, opt for a simple crimped edge, using your thumb and forefinger to create a uniform pattern.
Garnishing with a dusting of powdered sugar or an artfully drizzled glaze enhances the visual allure, offering an elegant touch perfect for fruit-filled pies.
Pair traditional accompaniments such as whipped cream or ice cream with warm, savory or fruity pies for a delightful contrast in temperature and texture.
Embrace modern serving suggestions by slicing the pie into individual servings before guests arrive for effortless elegance. Stack slices on a cake stand to create a striking table centerpiece.
Maintain appropriate temperature; serve warm pies with cold fillings, like custards, at room temperature, or chilled for a refreshing contrast, keeping each bite delightful.
Practice portion control by pre-slicing your pie into consistent servings, ensuring each guest receives an equal portion without compromising aesthetics.
Wine and Beverage Pairing
Pair your all butter pie crust desserts with dessert wines such as Moscato or Sauternes, which complement the crust’s buttery richness with their sweet profiles and crisp finishes.
For non-alcoholic alternatives, consider offering apple cider or chamomile tea that harmonizes well with the crust’s buttery depth, offering a gentle, palate-cleansing contrast.
Coffee lovers will find comfort in serving pies with a steaming cup of dark roasted coffee, its bitterness balancing the sweetness of most pie fillings while enhancing the crust’s richness.
Consider beverage temperature carefully. A chilled white wine accentuates a warm apple pie, just as a hot cup of tea enhances the soothing qualities of a cold slice of custard tart.
Serve beverages in appropriate glassware to elevate the dining experience, whether it’s elegant wine glasses or charming teacups, amplifying the sensory indulgence of your pie crust dessert.
Storage and Shelf Life
Proper storage is key to maximizing the lifespan of your pie crust. Wrap the dough tightly in plastic wrap or aluminum foil and store it in the refrigerator for up to three days before baking.
For extended storage, freeze the crust. Ensure it’s well-wrapped to prevent freezer burn, and it can last for up to three months. Thaw overnight in the fridge before use.
Opt for airtight containers to avoid the absorption of fridge odors, keeping the dough’s freshness intact. Store baked pie crusts at room temperature for up to two days in a breathable tin or paper bag.
Lookout for signs of spoilage, such as off odors or discoloration, indicating the crust is past its prime. Freshness is dictated by aroma and texture, pivotal in ensuring a delicious outcome.
When reheating, place your pie or crust in the oven at a low temperature to avoid sogginess, maintaining its original flaky texture post-freezing.
Freezing guidelines suggest pre-freezing the dough flat before storing to save space and ensure easy thawing. This technique provides convenience and speed in subsequent baking sessions.
Make Ahead Strategies
Implement time-saving make-ahead strategies by preparing the dough a day in advance, allowing for enhanced flavor as it rests in the refrigerator.
Store the dough between refrigeration and rolling steps to ensure it remains stable and easy to handle, preventing frustrating stretches or tears during baking.
Assess quality impacts by tasting the pie crust post-refrigeration, allowing for any necessary adjustments in sugar or salt to maintain robust flavor.
Assemble ingredients beforehand, measuring out and organizing for a streamlined baking process, minimizing potential errors during preparation.
Utilize reheating guidelines to serve warm pie crusts without compromising texture, using a reheated oven method that maintains the crispness and flakiness while keeping your baking pure, fresh, and irresistible.
Enhance freshness just before serving with a final brush of butter or milk, reviving its golden glow and ensuring your pie crust remains eye-catching and palate-pleasing.
Scaling Instructions
When halving the recipe, adjust ingredient proportions evenly to maintain crust quality, using half the water and butter measurements for a smaller, intimate baking requirement.
To double or triple, calculate the exact ingredient increases necessary, ensuring even distribution and consistency throughout larger dough batches for no variance in flavor or texture.
Consider equipment adjustments, employing large mixing bowls or rolling pins to accommodate increased quantities efficiently, avoiding overflow and ensuring easy handling.
Modify timing, acknowledging that increased dough quantities may require additional preparation time for mixing and chilling, fully incorporating all ingredients to maintain quality.
Storage considerations include creating smaller dough portions for easy future use, freezing unused batches to optimize storage space and provide convenience in subsequent baking endeavors.
Nutritional Deep Dive
Delve into a macro breakdown of pie crust nutrition, attributing a significant portion to carbohydrates from the flour, with fat serving as the secondary contributor from the butter.
Examine micronutrient contributions, identifying traces of calcium and vitamin A within the ingredient lineup, though the crust serves primarily as an energy source through bulk macronutrients.
Highlight health benefits from using whole ingredients like butter, which adds creaminess without additives, promoting simple, pure indulgence that’s free from preservatives found in pre-made substitutes.
Adapt dietary considerations to prioritize a nutritional crust, incorporating whole wheat flour for enhanced fiber or omitting salt for sodium-conscious customization.
Analyze portion control strategies, measuring exact serving sizes to avoid overconsumption, balancing the crust’s richness with high-fiber fillings to support digestive health and satiety.
Leverage weight management tips, substituting full-fat butter with lighter options or experimenting with lower-calorie fillings, creating a crust that offers versatile yet healthful baking enjoyment.
Dietary Adaptations
For a gluten-free variation, use a certified gluten-free flour blend, ensuring no cross-contamination within all ingredients, allowing for a crust that meets dietary restrictions without sacrificing taste or texture integrity.
Craft a dairy-free version by substituting plant-based margarine or coconut oil in place of butter, achieving the same flaky result with a subtler, tropical hint of flavor.
Create a vegan pie crust by combining the gluten-free and dairy-free adaptations, ensuring all components align with vegan principles for a fully inclusive pie recipe.
Adapt for low-carb enthusiasts by incorporating nut flour substitutes, such as almond or coconut flour, significantly reducing carbohydrate content and aligning with ketogenic standards.
Engage paleo diet followers by incorporating nut-based flours and cold plant-based fats like ghee, respecting paleolithic guidelines while maintaining the crispness and flavor beloved in traditional crusts.
Explore low-FODMAP potential for those with sensitive digestion, utilizing tolerated alternatives like spelt flour or lactose-free butter, providing a delectable yet safe option for restrictive diets.
Fiction: Not all adaptations may fit all diets individually; adjust ingredients based on personal suitability and health requirements.
The Recipe
Perfect All Butter Pie Crust
Serves: 1 pie crust
Prep Time: 15 mins
Cook Time: 15 mins
Total Time: 30 mins
Kitchen Equipment Needed
- Mixing bowl
- Pastry cutter or fork
- Rolling pin
- Pie dish
- Plastic wrap
Ingredients
- 1 1/4 cups all-purpose flour
- 1/2 cup unsalted butter, chilled and diced
- 1/4 teaspoon salt
- 2-4 tablespoons ice water
Directions
- In a large mixing bowl, combine flour and salt.
- Cut in butter with a pastry cutter or fork until mixture resembles coarse crumbs.
- Add ice water, one tablespoon at a time, mixing until dough just holds together without being too wet or sticky.
- Shape dough into a ball, wrap in plastic wrap, and refrigerate for at least 15 minutes.
- Preheat the oven to 425°F (220°C).
- Roll out dough on a lightly floured surface into a circle large enough to cover your pie dish.
- Transfer to pie dish, trim excess edges, and fill or blind bake as needed.
Recipe Notes
- For a golden crust, brush with egg wash before baking.
- For savory pies, consider adding herbs or spices to the crust.
- If dough is too crumbly, add additional ice water a teaspoon at a time.
Troubleshooting Guide
Experiencing texture issues such as a tough crust might mean overworking your dough. Make sure to handle with light pressure and stop mixing once the dough is just combined.
If your crust isn’t flaking properly, check the butter’s temperature. Cold butter is vital for the desired layers and flakiness, while room temperature butter inhibits this texture creation.
Getting the right flavor balance can be tricky. Tasting the dough before adding water ensures seasoning is adjusted perfectly, especially when transitioning between sweet and savory pies.
A common temperature problem is a soggy base. Ensure your oven is preheated to optimal temperature, preventing a poorly set crust from absorbing excess moisture from the filling.
Overcoming equipment challenges includes using a food processor if you lack a pastry cutter, ensuring even mixing without harming dough consistency.
Altering ingredient substitutions informs proper creation adjustments. If you’re using alternatives like spelt flour, water ratios will change, demanding experimentation for ideal results.
Timing concerns interfere less when following rest periods accurately. Don’t cut short rest time, which lets gluten relax, providing easy-to-roll dough and improved final texture.
Recipe Success Stories
Our baking community loves sharing triumphs, especially re-creating this crust with personalized adaptations. Some readers have integrated cinnamon into the dough, producing a spiced base that enhances autumnal pies beautifully.
Variation successes include substituting half the flour with almond flour for a nutty, flavorful crust, lauded for adding unique taste dimensions to cream pies.
Adaptation stories show sprinkles of rosemary in galettes, offering a savory twist that pairs excellently with tomato or mushroom fillings, perfecting balance in flavors.
Reader suggestions emphasize using sour cream instead of water, promoting a tender crust and richer taste while ensuring novice bakers gain professional results.
Photography tips suggest utilizing natural light when photographing pies, accentuating their visual allure and vibrant golden hues, perfect for showcasing your baking masterpiece on social media.
Frequently Asked Questions
Can I make the pie crust ahead of time? Yes, you can prepare and refrigerate the dough for up to three days before baking. Freezing it for up to three months is also an option for longer storage.
What can I substitute for butter in the recipe? For a dairy-free version, substitute butter with coconut oil or plant-based margarine, ensuring all substitutions maintain similar measurement ratios.
How do I know when the pie crust is done baking? The crust should be golden brown around the edges and slightly firm to the touch, with a pleasant aroma indicating it’s done.
Why is my pie crust hard and not flaky? A hard crust can result from overmixing or using warm butter. It’s also crucial to rest the dough, allowing the formation of a tender, flaky finish post-baking.
Can I use this recipe for a savory pie? Absolutely. Adjust the salt content and consider adding herbs and spices that complement your savory filling choice.
Should I dock the pie crust? Docking your crust before blind baking prevents bubbling, ensuring an even surface ideal for adding fillings like custard or fruit.
What is the best way to roll out pie dough? Flour your rolling pin and surface to prevent sticking, then roll from the center outwards while rotating to maintain an even thickness.
How can I prevent my pie crust from shrinking? Allowing the dough to rest adequately in the fridge and not stretching it excessively during shaping minimizes shrinkage.
Is it necessary to blind bake every pie crust? Only blind bake if your filling doesn’t require baking, such as cream pies, ensuring the crust remains fully cooked and stable.
Can I make a larger batch and store the dough? Yes, scale the recipe as needed, freeze unused portions, and thaw before use for convenience and future pie endeavors.
Is all-purpose flour the only option for the crust? While all-purpose flour provides classic results, experimenting with whole grain or gluten-free blends offers diverse textures and flavors.
How can I fix a wet or sticky dough? If your dough is too wet, add flour one tablespoon at a time until it becomes easier to handle without surpassing its tender, cohesive quality.
Additional Resources
Explore related recipes like sweet tart crusts or puff pastry techniques to broaden your pastry repertoire and enjoy diverse results reflective of similar skills.
Technique guides offer insight into mastering butter incorporation and blind baking, ensuring your pastry skills remain unrivaled and adaptable across culinary challenges.
Ingredient information expands knowledge on flour types and alternative fats, arming you with expertise to make informed, creative choices when tackling new recipes.
Equipment recommendations enhance efficiency, guiding towards selections like adjustable rolling pins and silicone mats, which improve ease, speed, and precision in subsequential baking sessions.
Adapt to seasonal variations by visiting farmer’s markets for fresh flavor inspirations such as summer berries for fillings or autumn spices ideal for warm, inviting desserts all year round.
Join the Conversation
Join our community efforts in social media sharing, tagging your pie crust creations to inspire fellow bakers and showcase your unique interpretations.
Photography tips include using natural light and creative angles to capture your pie’s enticing textures, complemented by simple, rustic backdrops.
Leave recipe reviews to aid fellow enthusiasts, sharing insights or imaginative alterations that enhance everyone’s culinary pursuits and enjoyment.
Engage with the vibrant community by participating in discussions, offering encouragement to beginners, or sharing experience-driven tips in fostering collective growth.
Cultivate recipe variations with seasonal twists or cultural inflections, revolutionizing classic recipes into visionary delights that honor diverse culinary heritages within your creativity.