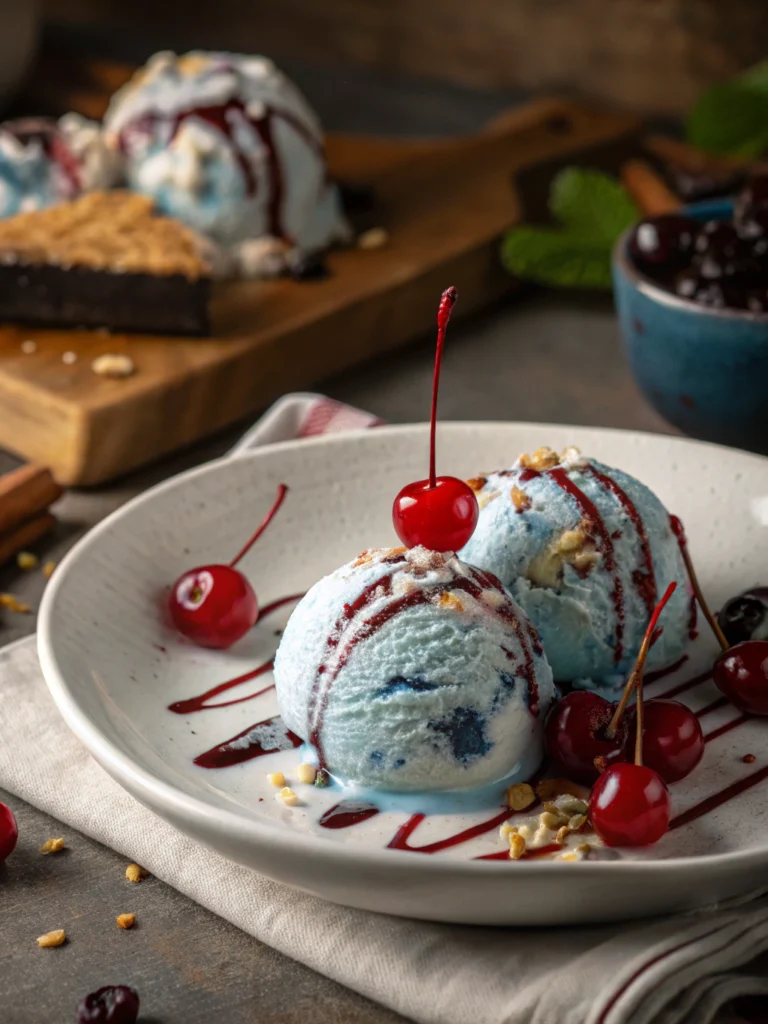
There’s something magical about ice cream that tastes like childhood nostalgia, isn’t there? The first time I tried Blue Moon ice cream at a tiny Midwest creamery, I was instantly transported back to sticky summer afternoons and the thrill of choosing the most whimsical flavor on the menu. That vibrant blue hue, the elusive fruity-vanilla flavor—it was like scooping up a little piece of the sky. Now, I’m thrilled to share my homemade version of this retro treat, perfect for bringing a little wonder to your dessert table.
The Mystery & Magic of Blue Moon
No one quite agrees on what Blue Moon ice cream actually tastes like—some say fruity pebbles, others swear it’s a mix of raspberry and lemon. That’s part of its charm! My version leans into the citrusy, berry-like magic with a hint of almond for depth. And yes, we’re using natural coloring (no neon blues here!).
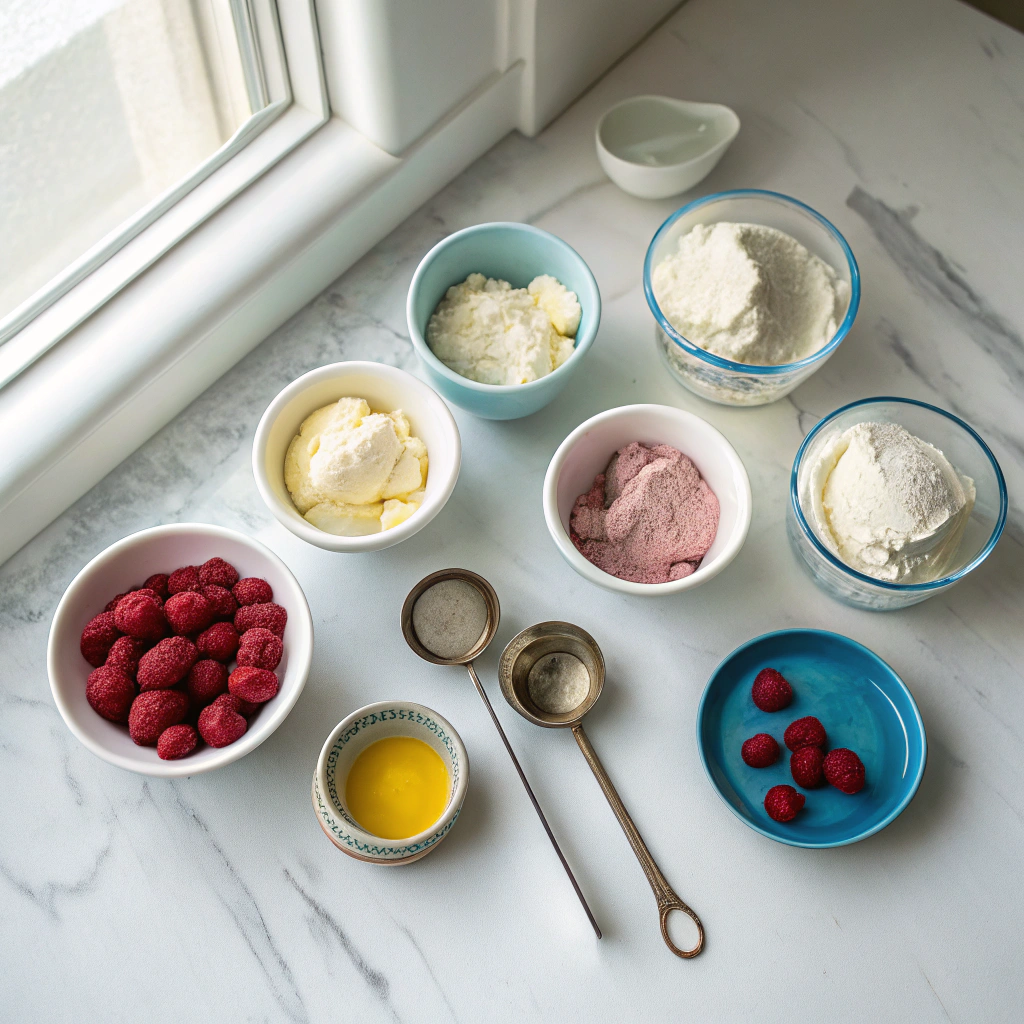
Ingredients You’ll Need
- 2 cups heavy cream – The richer, the creamier. Trust me.
- 1 cup whole milk – Whole milk adds the perfect silkiness.
- ¾ cup granulated sugar – Just enough sweetness to balance the tang.
- 1 tbsp vanilla extract – The backbone of that classic ice cream flavor.
- 1 tsp almond extract – The “secret” ingredient that gives Blue Moon its mysterious depth.
- 1 tsp raspberry extract – For that fruity whisper.
- ½ tsp lemon extract – A bright, citrusy lift.
- 1-2 drops blue spirulina or natural food coloring – For that dreamy sky-blue hue (add sparingly!).
- Pinch of salt – To make all the flavors pop.
Let’s Make the Magic Happen
- Chill out. Place your ice cream bowl in the freezer at least 24 hours ahead (if using an ice cream maker). No one likes lukewarm custard!
- Sweet dreams. In a medium saucepan over low heat, whisk together the milk, sugar, and salt until the sugar dissolves—no boiling needed! Remove from heat and let cool slightly.
- Whip it good. In a separate bowl, whip the heavy cream to soft peaks. Gently fold in the vanilla, almond, raspberry, and lemon extracts. This is where the flavor alchemy begins!
- Color your world. Add the blue coloring drop by drop until you reach that signature sky-blue shade. Remember: less is more—you can always add more, but you can’t take it away!
- Marry the mixtures. Slowly pour the cooled milk mixture into the whipped cream, folding gently to keep things airy. Taste and adjust extracts if needed (maybe you want a little more raspberry zing?).
- Churn, baby, churn. Pour into your ice cream maker and churn according to manufacturer’s instructions (usually 20-25 minutes). If you don’t have one, pour into a loaf pan and freeze, stirring every 30 minutes for the first 2 hours to prevent ice crystals.
Tip: For an extra-smooth texture, press plastic wrap directly onto the surface before freezing. This prevents pesky ice crystals!
Now that you’ve mastered the basics of making this nostalgic blue moon ice cream, let’s dive into some pro tips and fun variations to make it your own!
Pro Tips & Variations
- Flavor boost: For an extra punch of flavor, add 1/4 tsp of lemon extract along with the vanilla
- Dairy-free option: Substitute coconut milk or almond milk for the heavy cream and whole milk
- Color variations: Try purple food coloring for a “galaxy” version or pastel blue for a softer look
- Mix-in ideas: Fold in crushed marshmallows or rainbow sprinkles after churning for extra fun
Perfect Pairings
Blue moon ice cream is delightful on its own, but here are some serving suggestions to make it extra special:
- Classic ice cream cones with rainbow sprinkles
- Warm cherry or blueberry pie à la mode
- As part of an old-fashioned ice cream float with lemon-lime soda
- Layered in a parfait with fresh berries and whipped cream
Storage & Serving Tips
To keep your blue moon ice cream tasting its best:
- Store in an airtight container with parchment paper pressed directly on the surface
- Keeps for 2-3 weeks in the freezer (if it lasts that long!)
- Let sit at room temperature for 5-10 minutes before scooping for perfect consistency
- For single servings, scoop into muffin tins and freeze individually before transferring to bags
Frequently Asked Questions
Q: Why is it called blue moon ice cream?
A: The name’s origin is mysterious, but many believe it comes from the phrase “once in a blue moon” because of its unique flavor that’s hard to describe.
Q: Can I make this without an ice cream maker?
A: Absolutely! Pour the mixture into a shallow pan, freeze for 2 hours, then whisk vigorously. Repeat every 30 minutes until set.
Q: Is blue moon ice cream the same as Superman ice cream?
A: Similar, but not identical! Superman ice cream typically combines blue moon with cherry and vanilla flavors.
Q: What gives blue moon ice cream its distinct flavor?
A: While recipes vary, the signature taste comes from a combination of vanilla, almond, and citrus notes – often with a hint of raspberry.
There’s something truly magical about that first spoonful of blue moon ice cream – the creamy texture, the vibrant color, and that mysterious flavor that instantly transports you back to childhood summers. Whether you’re making it for a special occasion or just to satisfy a nostalgic craving, this cheerful treat is sure to bring smiles. Don’t be surprised if it becomes your new favorite “once in a blue moon” indulgence!
PrintBlue Moon Ice Cream
A vibrant and fruity homemade ice cream with a mysterious blue hue and a unique flavor.
Ingredients
For the Crust:
- 2 cups heavy cream
- 1 cup whole milk
- 3/4 cup granulated sugar
- 1 tablespoon vanilla extract
- 1 teaspoon raspberry extract
- 1 teaspoon lemon extract
- 1/4 teaspoon blue food coloring
Instructions
1. Prepare the Crust:
- In a large bowl, whisk together the heavy cream, milk, and sugar until the sugar is fully dissolved.
- Add the vanilla extract, raspberry extract, lemon extract, and blue food coloring. Stir until well combined and the mixture turns a uniform blue color.
- Pour the mixture into an ice cream maker and churn according to the manufacturer’s instructions, usually about 20-25 minutes, until thick and creamy.
- Transfer the ice cream to a freezer-safe container and freeze for at least 4 hours or until firm before serving.
Notes
You can customize the seasonings to taste.