


Best Rustic Italian Crusty Bread: A Quick and Delicious Delight
Discover the charm of an Italian bakery in your own kitchen with our Best Rustic Italian Crusty Bread, ready in just 30 minutes. This recipe brings together the rustic, hearty flavors of traditional Italian bread with a quick and easy approach, perfect for those busy days. Imagine biting into a warm, crusty loaf with a fluffy inside, the aroma of freshly baked bread filling your home.
This rustic Italian bread is ideal for those who appreciate the art of bread-making without spending hours in the kitchen. The recipe requires minimal ingredients and effort, yet delivers maximum flavor and satisfaction. It’s a great way to impress your family and friends with your culinary skills, even if you’re new to baking.
Quick Recipe Highlights
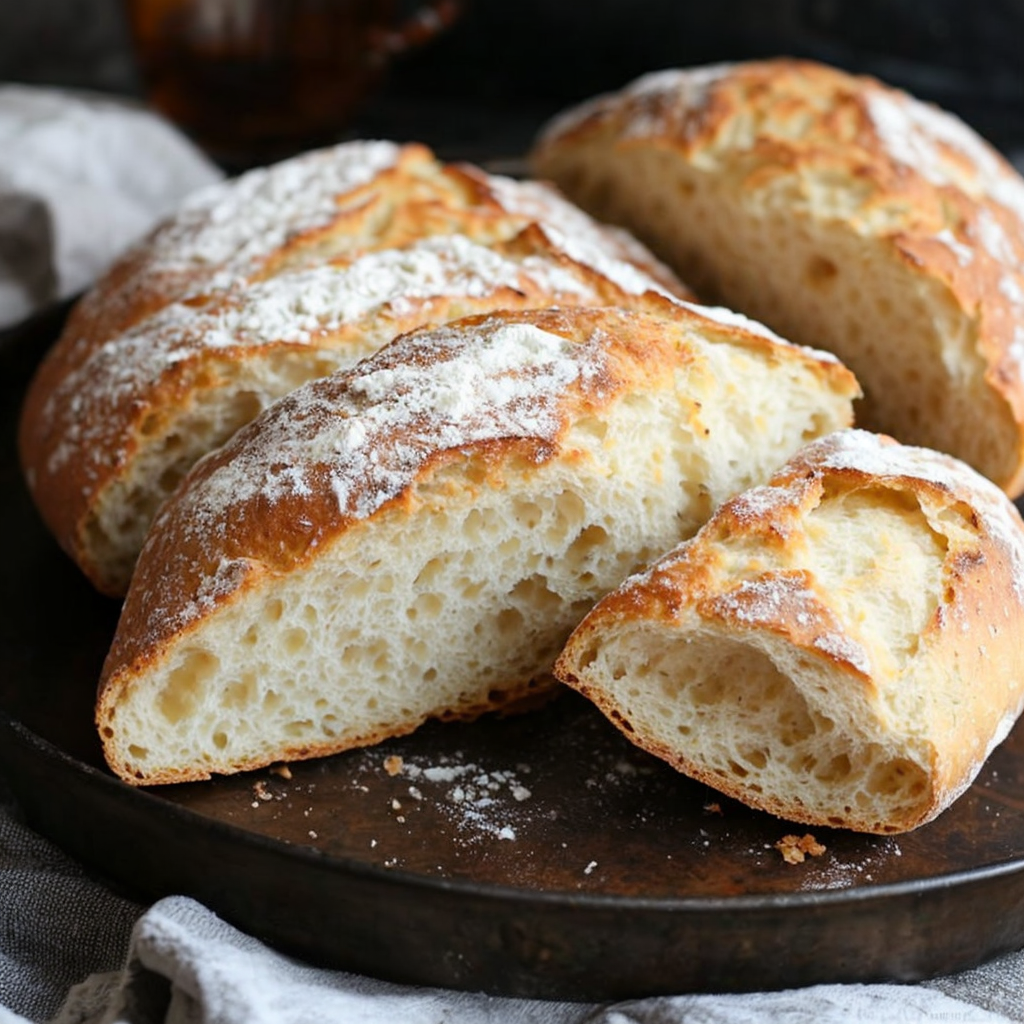
- Flavor Profile: Indulge in the robust taste of a well-baked crust with a soft and airy crumb. The subtle hint of olive oil and salt enhances the natural wheat flavor.
- Texture: Experience the perfect balance of a crispy crust with a tender, chewy interior, making each bite a delightful contrast in textures.
- Aroma: Smell the distinctive scent of freshly baked bread, warm and inviting, filling your kitchen as it bakes.
- Visual Appeal: Admire the rustic, golden-brown crust of the bread, with a slightly flour-dusted top, evoking the traditional Italian countryside style.
- Skill Level Needed: Suitable for beginners, this recipe simplifies traditional bread-making, ensuring successful results without complex techniques.
- Special Equipment: A baking sheet and parchment paper are all you need; a dutch oven can elevate the baking process but is not required.
Recipe Overview
- Difficulty Level: Easy – This recipe is designed for those who are new to bread-making, requiring simple steps and no kneading, yet delivering excellent results.
- Category: Bread – A staple category that complements virtually any meal, from soups to salads and main courses.
- Cuisine: Italian – This bread embodies the simplicity and heartiness of Italian cuisine, with a nod to the rustic cooking tradition found in Italian villages.
- Cost: Economical – With just a few pantry staples, you can create a delicious loaf of bread without breaking the bank.
- Season: Suitable for all seasons, this bread adds warmth to winter meals and pairs beautifully with fresh summer dishes.
- Occasion: Perfect for everyday meals, special occasions, or whenever you’re craving freshly baked bread.
Why You’ll Love This Recipe
The taste and texture of this rustic Italian crusty bread are unmatched. The crispy outer crust gives way to a soft, airy interior that soaks up soups, stews, or olive oil beautifully. You’ll find that the balance between the slightly salty crust and the subtle sweetness of the dough makes it hard to stop at just one slice.
This recipe’s convenience can’t be overstated. With a total preparation and baking time of just 30 minutes, you can enjoy homemade bread without the usual long wait. The straightforward instructions ensure that even novice bakers can confidently produce a loaf worthy of a bakery.
Nutritionally, this bread offers a wholesome option that’s free from preservatives found in store-bought alternatives. Making your own bread allows you to control the quality of ingredients, ensuring a healthier choice for your family.
Socially, this bread makes a perfect accompaniment for gatherings and family meals. Its rustic look and homemade charm make it a conversation starter, and it pairs well with a variety of dishes, enhancing your meal’s overall experience.
Finally, the cost-effectiveness of this recipe is significant. Using basic, inexpensive ingredients and minimal equipment, you can produce a high-quality loaf at a fraction of the cost of artisan breads from the store. It’s a great way to enjoy delicious bread while staying budget-conscious.
Historical Background and Cultural Significance
The origins of this rustic Italian crusty bread can be traced back to the humble kitchens of rural Italy, where bread was a daily necessity. Italian families would bake bread in communal ovens, a tradition that fostered a sense of community and shared culinary heritage.
Culturally, bread holds significant importance in Italy as a symbol of nourishment and hospitality. From north to south, each region boasts its own variations and techniques, reflecting local ingredients and traditions.
Over time, this bread has evolved, with influences from different cultures integrating into the recipe. However, the core ethos remains the same—to create a simple yet flavorful bread that feeds both the body and soul.
Regional variations include differences in crust thickness and crumb density, influenced by local climates and available resources. What remains consistent is the characteristic rustic look and the delightful texture loved by many.
Ingredient Deep Dive
Flour is the heart of this recipe, serving as the building block of the bread. In Italy, local flours such as semolina or “00” flour are often used, contributing to the distinct texture and flavor. Whole wheat variants can also be used for a denser, more nutrient-rich bread.
The water in this recipe hydrates the flour, facilitating gluten development which provides the bread’s structure. Opt for filtered or spring water to avoid any impurities that might affect the dough’s rise.
Olive oil adds a subtle richness and enhances the bread’s flavor, paying homage to its Mediterranean roots. Using high-quality extra virgin olive oil will lend a fruity, grassy note traditional in Italian cuisine.
Yeast, the leavening agent in this recipe, transforms the dough, enabling it to rise and achieve its airy texture. Quick-rise yeast is used for convenience, expediting the fermentation process while maintaining the desired flavor profile.
Common Mistakes to Avoid
- Not measuring ingredients accurately can lead to incorrect dough consistency. Use a scale for precision.
- Skipping the resting phase results in a dense loaf. Allow the dough time to rise and develop flavor.
- Baking at the wrong temperature can yield an uneven crust. Preheat the oven completely before baking.
- Using old or inactive yeast will prevent the bread from rising. Always check the yeast’s expiration date.
- Over-kneading can break down gluten structure. Follow the mixing instructions carefully.
- Cutting the bread too soon can lead to a gummy texture. Allow it to cool slightly before slicing.
- Ignoring humidity’s impact can affect dough hydration. Adjust water content as needed in dry or humid conditions.
- Skipping the steam step results in a less crispy crust. Place a water tray in the oven to ensure the crust is perfect.
Essential Techniques
Mixing ingredients not only incorporates them but also begins gluten development. A gentle hand mix during initial stages facilitates even hydration.
The resting phase is crucial, allowing the dough to relax and gluten to strengthen, essential for an airy crumb.
Preheating the oven is vital. It ensures the bread starts cooking at the proper temperature, leading to a well-formed crust.
Creating steam in the oven is essential for a crusty exterior. A metal pan with water or misting with a spray bottle achieves this easily.
Pro Tips for Perfect Rustic Italian Crusty Bread
Allow your dough to rise in a warm, draft-free area to encourage proper leavening, aiding in flavor and texture development.
For an earthier taste, experiment with whole grain or heritage flours, adjusting hydration for the best results.
Use a kitchen thermometer to ensure your bread’s internal temperature is around 93°C (200°F) for doneness.
For added flavor, incorporate dried herbs or roasted garlic into the dough as an easy flavor boost.
Score your dough with a sharp knife just before baking to control its expansion during cooking and improve its visual appeal.
For a shiny crust, bush the dough with egg wash or melted butter before placing it in the oven.
Variations and Adaptations
Regional variations might include adding olives for a Puglian twist, or rosemary and sea salt for a Tuscan flavor.
Seasonal adaptations include using fresh herbs during the spring or dried during winter months to suit climate and availability.
Dietary modifications are simple; replace with gluten-free flour blends for a gluten-free version, adjusting for hydration differences.
Flavor variations can involve adding sun-dried tomatoes or Parmesan cheese for a richer, more robust bread.
Texture modifications, such as using half whole wheat flour, offer a denser, more nutritious loaf while retaining some traditional crumb lightness.
Presentation alternatives might involve forming rolls or a braided loaf for a more intricate visual display at gatherings.
Serving and Presentation Guide
For an authentic Italian experience, consider serving slices with a small dish of high-quality olive oil for dipping.
Garnish with fresh, vibrant herbs like basil or parsley to visually appeal and to complement its rustic charm.
Traditional accompaniments include hearty soups, rich stews, or a variety of Italian cheeses and cold cuts.
Modern serving suggestions can include using it as a base for bruschetta, perfect for appetizers or light meals.
Temperature considerations remind us that this bread is ideally served warm to accentuate its texture and aroma.
Control portions by slicing consistently with a serrated knife, offering a neat presentation for guests.
Wine and Beverage Pairing
Pair this bread with a light, fruity red like Chianti for a classic Italian duo. The wine’s acidity will complement the bread’s mild sweetness and crispy texture.
For non-alcoholic options, a chilled sparkling water or a light herbal tea works wonderfully, refreshing the palate between bites.
If you prefer coffee or tea, choose a mild, smooth coffee or a light black tea to balance the bread’s flavors without overpowering them.
Ensure your beverage choices are served at the right temperatures to maintain their integrity and enhance the bread’s flavor profile.
Storage and Shelf Life
To store, wrap the bread in a clean kitchen towel or place it in a breathable linen bag, maintaining its crustiness for up to three days at room temperature.
For longer storage, slice and freeze the bread, separating slices with parchment paper, ideal for quick thawing and reheating.
Signs of spoilage include mold growth or a sour smell, indicating it’s time for a new batch.
To reheat, sprinkle a little water on top and bake at a low temperature for 5-10 minutes to restore freshness.
Freezing leftover bread is recommended; ensure you cool it completely before freezing to prevent ice from forming.
Make Ahead Strategies
Prepare the dough a day before and refrigerate it, covered, to develop deeper flavors, allowing more flexibility in baking time.
Store par-baked bread by slightly underbaking it, then finish the baking process just before serving to ensure it’s fresh.
Assess the quality impact of refrigeration or freezing on dough elasticity and final crumb texture.
For optimum freshness, incorporate fresh toppings like herbs after the final bake.
Reheating guidelines recommend using a low oven temperature to gently refresh the bread, reawakening its crust.
Scaling Instructions
Halve the recipe for smaller batches, maintaining ingredient ratios to ensure consistent results in texture and flavor.
Doubling or tripling is straightforward—fortunately, the large batch mixing requires minimal extra effort due to the no-knead method.
Adjust baking times slightly with larger loaves, ensuring the center is cooked through without toughening the crust.
Store additional dough portions in the fridge 2-3 days before baking, if making ahead, and bake as needed for fresh bread anytime.
Nutritional Deep Dive
This bread offers a balance of macronutrients, providing carbohydrates for energy, with low-fat contents, focused on healthy, unsaturated fats.
Rich in essential minerals like iron and calcium, whole grain variations enhance these benefits with additional fiber.
Dietary considerations note its suitability for vegetarians, with modifications available for vegan or gluten-free preferences.
For weight management, consider portion sizes and whole grain options to increase fiber content, promoting satiety.
Dietary Adaptations
For a gluten-free adaptation, use a gluten-free all-purpose flour blend. Adjust liquid content as necessary for optimal dough consistency.
To make it dairy-free, maintain the existing recipe ingredients, as it naturally contains no dairy products.
Vegan adaptations align with the original recipe, ensuring no animal products are included, suitable for plant-based diets.
For low-carb options, explore almond or coconut flour, acknowledging moisture and textural differences in the final result.
The ketogenic diet can accommodate this bread using innovative high-fat recipe alterations, such as incorporating cheese or oil.
Paleo adjustments might include almond meal or cassava flour variants, focusing on whole, unrefined ingredients.
This recipe naturally fits a low-FODMAP diet due to its simple ingredient list, adaptable with specific flours as necessary.
The Recipe
Best Rustic Italian Crusty Bread
Serves: 4-6
Prep Time: 15 mins
Cook Time: 15 mins
Total Time: 30 mins
Kitchen Equipment Needed
- Baking sheet
- Parchment paper
- Mixing bowl
- Measuring cups
- Spoon or spatula
- Oven
Ingredients
- 2 cups all-purpose flour
- 1 cup warm water
- 1 packet quick-rise yeast (2 ¼ tsp)
- 1 tsp salt
- 1 tbsp olive oil (plus more for drizzling)
Directions
- Preheat your oven to 220°C (425°F). Line a baking sheet with parchment paper.
- In a large mixing bowl, combine the flour, yeast, and salt. Gradually add the warm water and olive oil, mixing until a rough, sticky dough forms.
- Cover the bowl with a towel and let the dough rest for 10 minutes. This allows the yeast to start activating.
- Turn the dough out onto the prepared baking sheet, shaping it into a rough loaf without over-handling.
- Drizzle the top with olive oil, making light shallow cuts across the surface for rustic aesthetics.
- Bake for 15 minutes or until the crust is golden brown and sounds hollow when tapped.
- Remove from the oven and allow to cool slightly before slicing and serving.
Recipe Notes
- For extra flavor, add a teaspoon of dried herbs to the flour mixture.
- This recipe can be doubled easily to make an extra loaf.
- For a gluten-free version, substitute with a gluten-free flour blend and adjust the water as needed.
Troubleshooting Guide
Fix texture issues by ensuring the dough hydration is correct; wetter doughs usually yield a softer crumb.
For flavor balance, adjust salt and olive oil—ensure the latter is high quality for maximum taste impact.
Temperature problems such as uneven baking require a reliable oven thermometer to ensure accurate heat levels.
Address equipment challenges with a non-stick baking sheet, providing a consistent and manageable baking surface.
Ingredient substitutions should be tested in small batches to ensure consistent results and desired flavor profiles.
Over or under-baked bread indicates timing concerns; monitoring oven behavior ensures adjustments are made promptly.
Recipe Success Stories
Our readers often share their success with this versatile bread, noting its simplicity in execution and delightful flavor.
Community feedback highlights its adaptability as both a staple side and a standout centerpiece for special meals.
Recipe variations, including the addition of herbs or cheeses, have proven popular and visually appealing.
Photography tips shared by our community emphasize capturing the bread’s textured crust and inviting crumb.
Adaptation stories reveal creative takes, such as turning this simple bread into a flavorful herb or cheese loaf.
Frequently Asked Questions
Can I make this bread without yeast?
While yeast is key for texture and rise, you can substitute it with baking powder for a quick bread version.
What if I don’t have olive oil?
Other cooking oils like canola or vegetable oil can be used, though flavor profiles will differ slightly.
How do I ensure the crust is extra crispy?
Lightly misting with water before baking or using a steam method creates a crunchier crust.
Can I prepare the dough in advance?
Yes, keep the dough refrigerated for up to 24 hours, then proceed with shaping and baking.
Is a stand mixer necessary?
No, this dough is easily mixed by hand, simplifying preparation and cleanup.
How do I prevent the bread from sticking?
Parchment paper or non-stick baking sheets ensure smooth removal without added greasing.
What’s the best way to reheat this bread?
Wrap in foil and heat briefly in the oven to recreate its freshly baked aroma and texture.
How can I make my bread lighter?
Ensure your yeast quality, hydrate properly, and avoid over-mixing or excess flour.
Can I use bread flour instead of all-purpose?
Yes, bread flour provides a chewier texture due to its higher protein content.
What herbs are best to add?
Dried rosemary and thyme complement the bread’s rustic flavor beautifully.
Why didn’t my bread rise?
Inactive yeast, cold dough temperature, or insufficient rising time usually cause poor rise.
Can I make this bread in a bread machine?
Yes, modify the order by adding wet ingredients first, then dry, and use the basic bread setting.
Additional Resources
Explore our related recipes for soups and stews that pair beautifully with this rustic bread, perfect for delicious immersion.
Delve into technique guides focusing on bread-making skills like hydration, gluten formation, and crust development.
Ingredient information highlights quality choices and substitutes to broaden culinary understanding and enhance flavor.
For equipment recommendations, browse selections of baking sheets, thermometers, and storage containers to optimize results.
Seasonal variations offer insights into adapting the bread for different climates and ingredient availability, ensuring year-round enjoyment.
Join the Conversation
Share your baking results and modifications on social media using our hashtag for community feedback and engagement.
Photography tips suggest capturing the bread’s texture and color in natural lighting to best showcase its appeal.
Share recipe reviews, noting your successes or adaptations, helping others venture into delicious homemade bread-making.
Get involved with our recipe variations discussions, providing suggestions to enhance or modify this rustic classic.
Engage with our community for support and inspiration in your culinary journey, connecting with fellow enthusiasts.