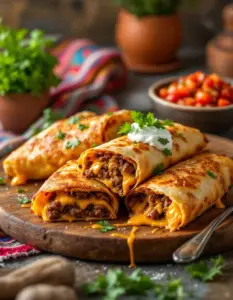
Crispy Beef and Cheese Chimichangas: A Flavor-Packed Tex-Mex Delight
These Beef and Cheese Chimichangas bring the vibrant flavors of Tex-Mex cuisine right to your dinner table. Imagine golden-brown tortillas stuffed with savory seasoned beef, melted cheese, and just the right amount of spice, all crisped to perfection. Whether you’re craving a satisfying weeknight meal or planning a festive gathering, these chimichangas deliver on both flavor and texture.
The beauty of this chimichanga recipe lies in its perfect balance of crispy exterior and gooey, flavorful filling. Each bite offers a delightful contrast between the crunchy fried tortilla and the tender beef mixture inside. With simple ingredients and straightforward techniques, you can recreate restaurant-quality chimichangas at home that will have everyone asking for seconds.
Quick Recipe Highlights
- Flavor Profile: Savory ground beef with Mexican spices, balanced by creamy melted cheese and a hint of heat from jalapeños.
- Texture: Crispy golden tortilla exterior gives way to a tender, cheesy beef filling with just the right amount of bite.
- Aroma: The scent of toasted cumin, garlic, and melted cheese will fill your kitchen as these chimichangas cook.
- Visual Appeal: Golden-brown parcels with melted cheese peeking through make for an irresistible presentation.
- Skill Level Needed: Basic cooking skills required, with some attention needed for proper frying technique.
- Special Equipment: Large skillet for frying and tongs for safe flipping are recommended.
Recipe Overview
- Difficulty Level: While not complicated, achieving the perfect crispness without burning requires some attention. The filling comes together easily, but the frying technique needs practice.
- Category: Perfect as a main dish for dinner or lunch, or cut into smaller portions as appetizers for parties.
- Cuisine: A beloved Tex-Mex creation that blends Mexican flavors with American frying techniques for a truly satisfying dish.
- Cost: Budget-friendly using common pantry staples and affordable ground beef as the protein base.
- Season: Excellent year-round, but particularly satisfying during cooler months when warm, comforting foods are preferred.
- Occasion: Versatile enough for casual family meals yet impressive for entertaining guests with a Mexican-themed dinner.
Why You’ll Love This Beef and Cheese Chimichangas Recipe
The combination of textures in these beef chimichangas is simply irresistible. The exterior achieves that perfect golden crispness while the interior stays moist and flavorful. Unlike some fried foods that feel heavy, these chimichangas maintain a wonderful lightness despite their satisfying crunch.
Preparation couldn’t be easier – the filling comes together in one skillet before being wrapped and fried. This makes cleanup a breeze compared to multi-pot meals. The recipe also lends itself beautifully to make-ahead preparation, with the filling tasting even better when made a day in advance.
Nutritionally, you’re getting a balanced meal with protein from the beef, calcium from the cheese, and fiber if you serve with beans or a fresh salad. By controlling the ingredients at home, you can make healthier choices than restaurant versions while still enjoying that indulgent fried flavor.
For entertaining, these chimichangas offer fantastic visual appeal when plated with colorful garnishes. They’re conversation starters that bring people together over shared enjoyment of great food. Guests will be impressed you made them from scratch rather than ordering takeout.
Economically, this recipe makes excellent use of affordable ground beef and basic pantry staples. A single batch yields generous portions that can feed a family or provide leftovers for another meal. The ingredients are accessible year-round at any supermarket.
Historical Background and Cultural Significance
The chimichanga’s origins are hotly debated among food historians, with both Arizona and Mexico claiming its creation. Most accounts agree it was likely invented in the early 20th century, possibly as an accidental deep-frying of a burrito. The name itself may derive from the Spanish word “chimichurri” or be a playful nonsense word.
In Tex-Mex cuisine, the chimichanga represents the beautiful fusion of Mexican flavors with American cooking techniques. While traditional Mexican cuisine features many fried foods, the specific concept of a deep-fried burrito seems to have developed along the border regions where culinary traditions blended.
Over time, the chimichanga evolved from a regional specialty to a mainstream menu item across North America. Different regions developed their own variations – some smothered in sauce, others served dry with dips, some featuring unique local ingredients. This recipe stays true to the classic beef and cheese version that made chimichangas famous.
Today, chimichangas hold a special place in Mexican-American culinary culture, representing the creativity and adaptability of border cuisine. They’re celebrated in festivals and have even inspired dessert versions, proving their enduring popularity across generations.
Ingredient Deep Dive
Ground Beef: The foundation of our filling, ground beef brings rich, savory flavor and satisfying texture. Opt for 80/20 lean-to-fat ratio for optimal moisture without excessive grease. Grass-fed varieties offer more complex flavor, while conventional beef provides consistent results. For food safety, always cook ground beef to 160°F internal temperature.
Cheese Blend: A combination of Monterey Jack and cheddar creates the perfect melt and flavor balance. Jack cheese offers superior melting qualities, while cheddar provides sharpness. For best results, shred your own cheese rather than using pre-shredded, which contains anti-caking agents that can affect texture.
Flour Tortillas: The vessel for our creation, fresh flour tortillas make all the difference. Look for medium-thickness tortillas about 8 inches in diameter – too thin and they’ll tear, too thick and they won’t crisp properly. For extra flavor, try spinach or tomato-infused varieties.
Common Mistakes to Avoid
- Overfilling the tortillas leads to bursting during frying. Stick to about 1/2 cup filling per chimichanga.
- Using cold tortillas straight from the fridge makes them crack when folded. Always bring to room temperature first.
- Frying at too low temperature results in greasy chimichangas. Maintain oil at 350-375°F for perfect crispness.
- Not draining the beef properly after browning makes the filling too wet, causing sogginess.
- Overcrowding the pan when frying lowers the oil temperature and leads to uneven cooking.
- Skipping the toothpick or folding technique to secure the chimichanga causes it to unfold while frying.
- Using pre-shredded cheese can result in a grainy texture rather than smooth melt.
- Not letting the chimichangas rest after frying leads to burns from escaping steam.
Essential Techniques
Proper Folding: Mastering the burrito fold is crucial for chimichangas that stay sealed during frying. Place filling slightly off-center, fold sides inward, then roll tightly away from you. A dab of beaten egg or flour paste can help seal the final edge if needed.
Temperature Control: Maintaining consistent oil temperature ensures even cooking without greasiness. Use a deep-fry thermometer and adjust heat as needed. The oil should bubble vigorously but not smoke when the chimichanga is added.
Draining Technique: After frying, let chimichangas drain on a wire rack rather than paper towels. This prevents sogginess on one side while allowing excess oil to drip away evenly.
Pro Tips for Perfect Beef and Cheese Chimichangas
- For extra flavor, toast the tortillas lightly before filling to enhance their nutty taste.
- Let the filling cool slightly before assembling to prevent the tortillas from becoming soggy.
- Use a slotted spoon to transfer the chimichangas in and out of the oil for safety and control.
- Fry in small batches to maintain oil temperature and prevent sticking.
- For a lighter version, brush with oil and bake at 425°F until crispy instead of deep-frying.
- Add a teaspoon of cornstarch to the beef mixture to help absorb excess moisture.
Variations and Adaptations
Regional Variations: Try Sonoran-style with shredded beef or Arizona-style with added green chiles. New Mexico versions often include hatch chiles for distinctive flavor.
Dietary Modifications: For gluten-free, use corn tortillas and gluten-free flour for sealing. Vegan versions can substitute seasoned lentils or mushrooms for beef and dairy-free cheese.
Flavor Twists: Add chipotle peppers for smokiness or pineapple for sweet heat. Swapping in chorizo for half the beef creates a spicier profile.
Serving and Presentation Guide
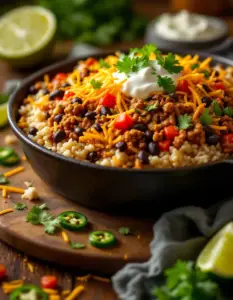
Present your chimichangas diagonally on rectangular plates for elegant dining. Garnish with lime wedges, fresh cilantro, and a drizzle of crema for color contrast. Serve with sides arranged separately to maintain crispness – refried beans, Mexican rice, and guacamole make classic accompaniments.
For parties, cut chimichangas into thirds and serve upright in shot glasses with various dipping sauces. Include small flags identifying heat levels if offering multiple spice variations. A communal platter with all the fixings encourages sharing and conversation.
Wine and Beverage Pairing
A crisp, citrusy white like Sauvignon Blanc cuts through the richness beautifully. For red lovers, a fruity Zinfandel stands up to the bold flavors. Non-alcoholic options include hibiscus tea (agua de jamaica) or tamarind soda (Jarritos).
Beer enthusiasts will enjoy a Mexican lager or amber ale with these chimichangas. The carbonation cleanses the palate between bites while complementing the spices. For a special treat, try a michelada – the spicy, tangy beer cocktail enhances every flavor.
Storage and Shelf Life
Cooked chimichangas keep well refrigerated for 3-4 days when stored in airtight containers. Reheat in a 375°F oven for 10-12 minutes to restore crispness. Avoid microwaving as it makes them soggy.
For freezing, wrap uncooked chimichangas individually in plastic then foil. Fry directly from frozen, adding 1-2 minutes to cooking time. The filling can be frozen separately for up to 3 months.
Make Ahead Strategies
The beef filling actually improves when made 1-2 days ahead, allowing flavors to meld. Store covered in the refrigerator and bring to room temperature before assembling.
For entertaining, assemble chimichangas up to 4 hours before frying and keep covered in the fridge. This spreads out the work while ensuring fresh, hot results when guests arrive.
Scaling Instructions
This recipe doubles beautifully for crowds. Use two skillets for frying to maintain temperature control. For smaller batches, the filling freezes well for future use.
When tripling, cook the beef in batches to avoid steaming. Mix all batches together at the end to evenly distribute flavors. Consider baking some to reduce frying workload.
Nutritional Deep Dive
Each chimichanga provides approximately 450-500 calories, with 25g protein, 30g carbs, and 25g fat. Using lean beef and reduced-fat cheese can lower calories without sacrificing flavor.
The dish offers iron from beef, calcium from cheese, and B vitamins from both. Adding vegetables like peppers increases fiber and vitamin content. Balance with fresh sides for a complete meal.
Dietary Adaptations
Gluten-Free: Use certified GF tortillas and thicken the filling with cornstarch instead of flour. Check all seasoning blends for hidden gluten.
Low-Carb/Keto: Substitute low-carb tortillas or wrap in lettuce leaves. Increase cheese and add avocado for healthy fats while reducing beans or rice sides.
Vegetarian: Replace beef with a mixture of black beans, mushrooms, and walnuts for meaty texture. Use vegetable broth instead of beef stock.
Troubleshooting Guide
Soggy Chimichangas: Ensure filling isn’t too wet and oil is hot enough. Let drain on a rack rather than paper towels.
Bursting While Frying: Don’t overfill, and secure edges well. Use toothpicks if necessary, removing them before serving.
Uneven Browning: Maintain consistent oil temperature and turn chimichangas carefully with tongs for even exposure.
Frequently Asked Questions
Can I bake instead of fry? Yes! Brush with oil and bake at 425°F for 15-20 minutes until crispy. Flip halfway for even browning.
What’s the best oil for frying? Neutral oils with high smoke points like canola, vegetable, or peanut oil work best.
How do I know when they’re done? They should be golden brown all over, about 2-3 minutes per side at 375°F.
Can I use corn tortillas? Flour tortillas work best as corn tends to crack when folded. If using corn, warm them first.
How spicy is this recipe? The heat level is moderate but adjustable – reduce or omit jalapeños for milder flavor.
Additional Resources
Explore our guide to perfect Mexican rice to complete your meal. For dessert, consider churros or flan as authentic follow-ups to your chimichanga feast.
Learn proper deep-frying techniques in our kitchen skills section. Discover how to make fresh flour tortillas from scratch for ultimate authenticity.
Join the Conversation
Share your chimichanga creations with #HomemadeChimichangas! We love seeing your variations and presentation ideas. Leave a comment with your favorite fillings or ask any recipe questions.
Tag us in your photos for a chance to be featured. Don’t forget to rate the recipe after trying it – your feedback helps others discover this delicious dish!
The Recipe
Beef and Cheese Chimichangas
Serves: 4
Prep Time: 20 mins
Cook Time: 15 mins
Total Time: 35 mins
Kitchen Equipment Needed
- Large skillet
- Mixing bowls
- Tongs
- Deep-fry thermometer
- Paper towels or wire rack
Ingredients
- 1 lb ground beef (80/20 blend)
- 1 small onion, diced
- 2 cloves garlic, minced
- 1 jalapeño, seeded and diced
- 1 tbsp chili powder
- 1 tsp ground cumin
- 1 tsp paprika
- 1/2 tsp oregano
- 1/2 cup beef broth
- 1 cup shredded Monterey Jack cheese
- 1 cup shredded cheddar cheese
- 4 large flour tortillas (8-inch)
- Vegetable oil for frying
- Salt and pepper to taste
Directions
- In a large skillet over medium heat, brown the ground beef with onion, garlic, and jalapeño until no pink remains. Drain excess fat.
- Stir in spices and cook for 1 minute until fragrant. Add beef broth and simmer until liquid reduces by half, about 5 minutes. Remove from heat and let cool slightly.
- Mix cheeses together in a bowl. Stir half into the beef mixture, reserving the rest for topping if desired.
- Warm tortillas to make them pliable. Divide filling among tortillas, placing it slightly off-center. Fold sides inward, then roll tightly away from you to enclose filling.
- Heat 1 inch of oil in a clean skillet to 375°F. Carefully add chimichangas seam-side down and fry 2-3 minutes per side until golden brown.
- Drain on wire rack or paper towels. Serve immediately with desired toppings.
Recipe Notes
- For crispier results, double-fry: fry once at 350°F to cook through, then again at 375°F to crisp.
- Top with sour cream, guacamole, salsa, or pico de gallo as desired.
- Leftover filling makes excellent nachos or taco salad.