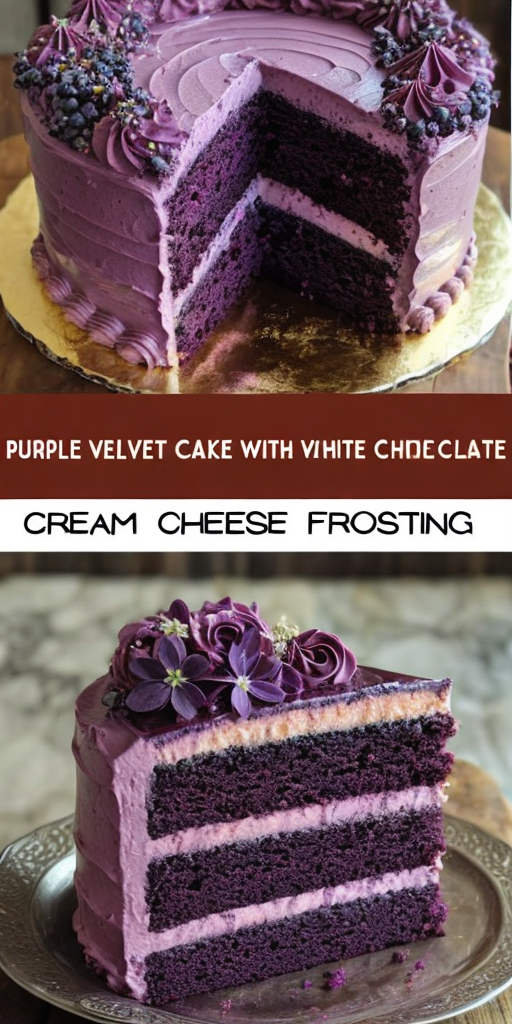
Easy Purple Velvet Cake – A Family Favorite Dessert
This Easy Purple Velvet Cake is the ultimate family favorite dessert that brings a vibrant twist to classic baking. With its striking purple hue and velvety texture, this cake is set to be your go-to for gatherings and celebrations. Perfectly moist and rich, the layers express a balance of sweetness and tang, a result of key ingredients harmoniously coming together. Whether you’re celebrating a birthday or simply indulging in weekend treats, this cake promises to captivate and delight with every slice.
The beauty of the Easy Purple Velvet Cake lies in its simplicity and the smiles it brings to the table. The cake packs a lush, velvety crumb that’s offset by a creamy frosting, adding a swoon-worthy finish. The scent of vanilla lures you in as the cake releases its aromatic warmth from the oven. This fusion of flavors and textures creates a memorable tasting experience, making it a cherished addition to your dessert repertoire.
Quick Recipe Highlights
- Flavor Profile: A delightful blend of sweet and slightly tangy notes, harmonizing beautifully with the creamy frosting.
- Texture: Each slice offers a moist and velvety experience, achieved by the blend of buttermilk and cocoa.
- Aroma: The inviting scent of vanilla and cocoa fills the kitchen, setting the stage for a delightful treat.
- Visual Appeal: The vivid purple layers provide a stunning visual with a creamy white frosting, making it a show-stopper on any table.
- Skill Level Needed: Ideal for beginners; no specialized techniques required.
- Special Equipment: Basic baking tools like cake pans, a mixer, and a spatula.
Recipe Overview
- Difficulty Level: This recipe is deemed easy due to simple steps and basic baking skills, making it accessible for novices and kids with supervision.
- Category: Perfect for desserts or as a celebratory cake for birthdays and special occasions.
- Cuisine: Originally stemming from Southern American roots, this cake is influenced by cultural tradition and modern twists.
- Cost: Relatively budget-friendly as it uses pantry staples and common baking supplies.
- Season: An all-year-round favorite, this cake shines especially during spring and summer festivities.
- Occasion: Suitable for birthdays, family gatherings, and holidays—it’s versatile enough to fit any festive occasion.
Why You’ll Love This Recipe
The taste and creamy texture of this Easy Purple Velvet Cake are truly unparalleled. Each bite melts in your mouth, leaving a lingering sweetness that’s not overbearing. The balance of flavors ensures it’s a cake that pleases adults and children alike. Not only is it tasty, but the step-by-step preparation also makes the process hassle-free, perfect for those busy days when time is of the essence but quality dessert is non-negotiable.
This cake is as convenient as it gets. Using simple, readily available ingredients means it’s a breeze to prepare. Its efficient preparation time ensures you aren’t spending excessive hours in the kitchen, making it perfect for spontaneous dessert cravings or unplanned guest appearances. Plus, it’s a crowd-pleaser, meaning you can never go wrong serving it.
There’s an element of nutritional value in this indulgence. When made with high-quality ingredients, it offers modest amounts of essential nutrients like protein and some vitamins. For those keen on maximizing their intake, alternative ingredients can be incorporated to enhance its nutritional profile.
Social gatherings call for a cake that makes a statement, and this Purple Velvet Cake does just that with its stunning appearance and delectable taste. It’s great for creating memorable dining experiences. Sharing this dessert sparks conversations and brings people together, celebrated for its unique twist on the much-loved red velvet tradition.
Cost-effectiveness comes with using common ingredients and straightforward techniques, keeping your budget in check without sacrificing quality. This cake provides versatility and accessibility, ensuring anyone can make it, even if you’re working within tight budget constraints or time limitations.
Historical Background and Cultural Significance
The Purple Velvet Cake finds its origins embedded in the classic red velvet recipe, a beloved tradition that traces back to the Victorian era. It was during this time that velvet cakes became popular, cherished for their fine and soft texture achieved through the unique combination of ingredients leading to what we now call “velvet”. As the cake journeyed through history, it took on various iterations and color transformations, one of which includes the modern and playful adaptation using purples.
In American culture, particularly in the South, red velvet cake is deeply ingrained in social customs and celebratory rites. This purple variation offers a nod to this tradition while simultaneously embracing creativity and modern culinary artistry. It has become symbolic in some regions, often affiliated with springtime festivities and Easter celebrations due to its vibrant hue.
Although originally crafted as a red counterpart, the evolution to purple adds a contemporary flair, appealing to those who seek not only flavor but aesthetic beauty in their culinary pursuits. This color shift suggests an openness to innovation in baking, expanding on traditional recipes to align with current tastes and preferences.
Regional variations often see the cake adorned with fresh fruits or adapted into cupcakes, both enhancing its visual presentation and refreshing its flavor profile. The concept of “velvet” cakes has crossed borders, inspiring flavors worldwide and serving as a foundation for diverse culinary experiments.
Ingredient Deep Dive
The primary ingredient that gives the Purple Velvet Cake its distinctive color is food coloring. Opt for gel-based colors for vibrancy while maintaining a minimal effect on the flavor.
Buttermilk is a cornerstone of the velvet cake, providing slight tanginess and contributing to the moist, tender crumb. It works its magic by reacting with baking soda, elevating the cake while maintaining its softness. When selecting buttermilk, ensure it’s fresh, or make a homemade version by mixing milk with a bit of vinegar or lemon juice.
Cocoa powder adds depth and subtle richness to the cake’s flavor profile. Use unsweetened, high-quality cocoa for the best results. Store it in a cool, dry place to maintain its freshness, locking in the intense chocolatey goodness that characterizes all velvet cakes.
Cream cheese is the standard for frosting, chosen for its creamy texture and tangy flavor that perfectly complements the cake’s sweetness. Look for full-fat cream cheese for maximum creaminess and flavor. To ensure the frosting is perfectly smooth, bring it to room temperature before mixing.
For an alternative or simply to add a twist, vanilla extract is essential to building layers of flavor in both cake and frosting. Use pure vanilla extract to avoid artificial flavors, and store it in a cool, dark place to preserve its potency.
Common Mistakes to Avoid
- Overmixing the batter can lead to a dense cake, lacking the desired velvet texture. Mix just until the ingredients are combined.
- Using expired baking soda may result in a flat cake, since it loses its potency over time. Always check the expiration date.
- Incorrect oven temperature can either overbake or underbake your cake. Use an oven thermometer to ensure accuracy.
- Skipping the buttermilk vinegar mix affects the cake’s softness. Ensure it’s part of the ingredient lineup for that signature texture.
- Not greasing the cake pans properly may lead to the cake sticking, causing damage to its structure.
- Using low-fat cream cheese can make the frosting runny, so opt for full-fat for stability and flavor.
- Cutting the cake before it cools completely may cause it to crumble. Always allow sufficient cooling time to let it set properly.
- Underestimating food coloring can lead to a less vivid appearance, so experiment until you reach your desired hue.
Essential Techniques
Creaming the butter and sugar is critical to achieving the cake’s signature lightness. This process incorporates air, enhancing the cake’s lift and texture. Use room temperature butter for optimal results and beat steadily until the mixture becomes pale and fluffy.
The gentle folding of dry ingredients into the wet is important to prevent overmixing and retain airiness. Rotate the bowl as you gently incorporate the flour mix, lifting the batter instead of stirring vigorously, thereby preserving the cake’s light, delicate tick.
Adding food color gradually until you achieve the perfect shade avoids overwhelm and unpredictability. Observe the batter’s transformation and balance until the ideal purple manifests. Work in a well-lit kitchen to get a true view of your coloring.
Pay attention to visual cues during baking rather than solely relying on timing. Your cake is done when a toothpick inserted in the center comes out clean and the edges start to pull away from the pan sides. These signs are more precise than time since oven calibrations can differ.
Pro Tips for Perfect Easy Purple Velvet Cake
Ensure all ingredients are at room temperature before mixing to encourage even blending and a uniform texture. Cold ingredients could prevent proper emulsification.
Carefully balance the food coloring, taking note that colors may darken slightly as they bake. Less is more when starting out; you can always add, but you can’t take away.
When baking, position cake pans in the center of the oven and avoid opening the door until near done, ensuring an even bake and preventing temperature fluctuation.
For silky smooth frosting, always sift your powdered sugar to avoid lumps and ensure a creamy finish with minimal effort.
Consider adding a dollop of sour cream to the batter for an extra moist cake, working in harmony with the buttermilk for enhanced moisture retention.
Cooling the cake upside down helps flatten the tops, making stacking easier when assembling layered cakes. Be sure your cooling racks are stable.
Rest the cream cheese frosting for a few minutes after mixing to reduce air bubbles before applying it with a spatula for an even coat.
Variations and Adaptations
Regional variations could include the addition of blueberry flavors for a more pronounced fruitiness, or a citrus twist with lemon zest intertwining within the frosting.
In winter months, a dash of cinnamon or clove can introduce a warming note, aligning the cake with festive gatherings and colder weather ambiance.
For dietary requirements, substitute regular flour with a gluten-free blend to make the cake celiac-friendly while maintaining a similar taste and structure.
Vegetable oil can replace butter, offering a denser crumb and a more subdued flavor that lets toppings like fresh berries take center stage.
Modify texture by incorporating chopped nuts or shredded coconut into the batter, adding a delightful crunch and unique touch to each bite.
Presentation enhancements can include edible flowers or intricate piping decorations, elevating the cake to centerpiece status at formal events.
Serving and Presentation Guide
For an elegant plating, serve slices with a side of fresh berries or a dollop of whipped cream, accentuating the cake’s purple hue with complementary colors.
Garnishing the cake with a sprinkling of powdered sugar or edible glitter brings an extra layer of visual artistry and festive appeal.
Traditional accompaniments such as vanilla ice cream or a scoop of sorbet provide a delightful contrast in temperature and texture, enhancing the tasting experience.
For a modern touch, consider serving the cake in cup or jar form, allowing each guest their personalized serving and ease of consumption.
Ensure that the cake is cooled and stored in a cool place before slicing to prevent crumbling, maintaining clean and neat presentation for platers.
When serving to a larger crowd, pre-cut the cake into equal portions to manage serving size and yield consistency, avoiding any waste or excess.
Wine and Beverage Pairing
Pair the cake with a smooth and subtle rosé to complement its sweetness and interact with the delicate cocoa flavor, providing a balanced sip that cleanses the palate.
For those seeking non-alcoholic alternatives, a lavender-infused iced tea or sparkling water with hints of berry creates a harmonious pairing, enhancing the cake’s floral notes.
Coffee enthusiasts might find a rich cappuccino or a simple espresso aligns beautifully with the creaminess of the frosting, enhancing the dessert’s luxurious feel.
Consider serving wines slightly chilled to spotlight the accompaniments and brighten the tasting experience, complementing the cake’s texture and flavors.
For a cozy pairing, serve alongside a hot chai latte or cinnamon-spiced cider, drawing out the cake’s warmth and mellow tones against the spicy sip.
Adjust beverage offerings based on your guests’ preferences and dietary restrictions, ensuring inclusivity while optimizing flavor interactions.
Storage and Shelf Life
Store leftover cake in an airtight container to maintain its moisture and prevent the frosting from drying out. A cake dome can also work effectively for short-term storage.
Keep the cake refrigerated to extend its shelf life up to four days, ensuring it stays as delicious as the day it was made. Bring slices to room temperature before serving.
Use appropriately sized containers to prevent any damage to the frosting or structure, stacking parchment paper between layers if stacking is necessary.
Monitor for spoilage indicators like mold or off-odors, ensuring any changes are detected early and the product is disposed of if compromised.
If you plan to freeze the cake, do so without the frosting for best results, tightly wrapping layers in plastic wrap followed by aluminum foil to avoid freezer burn.
To reheat, allow slices to reach room temperature first, then warm gently in an oven set low, restoring moisture without drying out the delicate cake.
Make Ahead Strategies
Prepare and bake the cake a day in advance, allowing flavors to develop overnight for enhanced taste and texture when serving.
Store baked layers at room temperature, wrapping tightly in plastic wrap and placing in a cool dry area, if not frosting immediately.
Refrigerate frosting until needed, giving it initial time to thicken and stabilize for easier application when assembling the cake.
Reheat any pre-baked layers gently in the oven at a low temperature to revive any lost moisture and ensure the cake is soft and inviting.
Consider assembling the cake shortly before serving to present the freshest version to guests, ensuring icing hasn’t seeped into the sponge.
If fresh berries or perishable elements are part of the recipe, add them just before serving time to maintain vibrancy and prevent wilting.
Scaling Instructions
For halving the recipe, reduce each ingredient by 50% and use a smaller pan, adjusting baking time to accommodate the change in volume without compromising on quality.
When doubling or tripling, ensure all elements such as pans and oven space can accommodate larger batter quantities to avoid spillage or uneven baking.
Utilize a stand mixer for larger quantities, ensuring the batter is mixed uniformly without exhausting your mixing tools or your arm.
Timing modifications might include checking the cake more frequently as the quantity increases, accounting for variable thermal dynamics in bulk.
Preserve the freshness of leftovers when scaling up by pre-portioning and storing effectively in shallow containers, preventing any stacking-induced squishing.
If refrigerating in scaled portions, lay parchment between slices or halves to minimize sticking and protect the cake’s structural integrity.
Nutritional Deep Dive
Macro breakdown includes moderate carbohydrates and fats balanced by proteins from eggs and added dairy, offering a nutritious indulgence option.
Micronutrient analysis reveals contributions of calcium, vitamin A, and small amounts of iron, derived from dairy and egg content within the recipe.
Health benefits are maximized by using wholesome ingredients, creating a dessert that satisfies more than just sweet tooth cravings, embracing its real-food nature.
Portion analysis can help manage caloric intake by assessing reasonable serving sizes, allowing for enjoyment without overindulgence.
Weight management is supported by balancing dessert consumption with an overall healthy diet, marking this recipe as part of a lifestyle, not just an occasional treat.
Dietary Adaptations
For a gluten-free version, substitute regular flour with gluten-free alternatives, maintaining structural integrity and taste.
To go dairy-free, swap buttermilk and cream cheese for plant-based alternatives like almond milk or cashew-based cream cheese, offering comparable results.
For vegans, utilize egg replacements such as flaxseed meal in water or commercial egg substitutes to replicate binding and moisture.
A low-carb adaptation might decrease sugar and substitute almond flour, still delivering the cake’s essence while adhering to dietary needs.
Explore keto-friendly modifications by reducing sugar and using coconut flour as a base, balancing the recipe as needed to fit macro requirements.
Paleo variations can introduce honey or maple syrup as sweeteners, with almond flour as a primary ingredient to emphasize natural, unprocessed components.
Embrace low-FODMAP elements by ensuring fruit and ingredient selections align with dietary restrictions, adjusting as needed for comfort without missing out on taste.
The Recipe
Easy Purple Velvet Cake
Serves: 8
Prep Time: 15 mins
Cook Time: 30 mins
Total Time: 45 mins
Kitchen Equipment Needed
- Mixing bowls
- Electric mixer
- Measuring cups and spoons
- Spatula
- 9-inch cake pans
- Cooling racks
Ingredients
- 2 ½ cups all-purpose flour
- 1 ½ cups granulated sugar
- 1 teaspoon baking soda
- 1 tablespoon cocoa powder
- 1 teaspoon salt
- 2 large eggs
- 1 cup vegetable oil
- 1 cup buttermilk
- 1 tablespoon vanilla extract
- 1 teaspoon white vinegar
- Purple gel food coloring
- 8 oz cream cheese
- ½ cup unsalted butter
- 2 ½ cups powdered sugar
- 1 teaspoon vanilla extract (for frosting)
Directions
- Preheat your oven to 350°F (175°C). Grease and flour two 9-inch cake pans.
- In a large mixing bowl, sift together flour, sugar, baking soda, cocoa powder, and salt. Set aside.
- In a separate bowl, whisk the eggs, then add the oil, buttermilk, vanilla extract, vinegar, and desired amount of food coloring.
- Gradually incorporate dry ingredients into the wet mixture, mixing until just combined.
- Divide the batter evenly between the prepared cake pans.
- Bake for approximately 30 minutes or until a toothpick inserted into the center comes out clean.
- Let cakes cool in the pans for 10 minutes, then turn out onto wire racks to cool completely.
- For the frosting, beat the cream cheese and butter together until smooth, then add powdered sugar and vanilla extract.
- Frost the top of one cake layer, place the second layer on top, then frost the entire cake.
Recipe Notes
- Adjust food coloring for desired shade of purple.
- For added moisture, brush layers with a simple syrup.
- Store leftovers in the refrigerator for up to four days.
- Double or halve the recipe according to your serving needs.
Troubleshooting Guide
Texture issues might surface if wet and dry mixes aren’t fully integrated. Ensure folds are thorough, respecting ingredient notes for better absorption and bonding.
For flavor imbalance, review the quantity of vinegar or food color for acidity, as slight adjustments aid in reaching that perfect balanced profile.
Temperature problems could arise with unstable frosting. Chill dough slightly if it’s too runny to help it set nicely on the cake.
When struggling with equipment, a hand mixer can replace a stand mixer if the latter is not available, though care should be taken not to over mix.
Ingredient substitutions, like using plant-based milk alternatives, might alter texture slightly, so observe consistency during mix and bake adjustments.
Concerns with timing adjustments arise if routines shift, requiring vigilant testing during baking by observing visual and sensory cues for accuracy.
Recipe Success Stories
Our community loves sharing their triumphant Purple Velvet Cake tales, each bringing unique variations and personal twists. Readers rave about how quickly the cake disappears at gatherings, earning them esteemed dessert-host titles.
Adaptation stories include fans who turned this cake into fun cupcakes for kids’ parties, thriving from stunning visuals and leftover-free outcomes. Reader suggestions often note using brown eggs for deeper batter color and sourcing local vanilla for an extra authentic aroma boost.
Photography tips from our community recommend shooting with ample natural light to capture the cake’s richness, or using color-matching props to accentuate the beautiful purple layers against contrasting hues.
Frequently Asked Questions
Can I use purple food powder instead of gel coloring?
Yes, you can use food powder; however, you may need to adjust the quantity for vibrancy as powders are generally less intense than gels. Aim for a rich indigo shade starting with less, since additional sprinkles always work.
What’s the ideal frosting texture for spreading?
Your frosting should be smooth and silky yet firm enough to hold shape when layered. Achieve this by keeping your cream cheese and butter at room temperature before whipping them together until well-mixed.
Why is vinegar used in the cake batter?
Vinegar plays a critical role by reacting with other ingredients to create the tender, moist crumb that defines velvet cakes. It subtly enhances flavor profiles, ensuring a rich satisfaction without overwhelming acidity.
How long should I bake the cake if using a different pan size?
Smaller pans may require a slightly longer bake time, while larger pans need less—start checking 5-10 minutes earlier for doneness. Visual cues such as clean toothpick touch and lightly pulling edges guide ideal completion.
Can I mix the frosting by hand?
While possible, you’ll need to employ extra elbow grease for smoothness, ideally using a silicone spatula and considerable whipping time. Adjust the powdered sugar to ensure no lumps remain, preventing grit in the frosting.
Why is my cake not rising correctly?
Issues may arise if baking soda has expired or if it wasn’t evenly distributed; always sift dry components thoroughly. Consider altering liquid viscosity in future trials, striking balances between thick and loose batters.
How to store leftovers if I frost the cake tonight?
Cover thoroughly to secure moisture within the cake and keep shifts from generals like fridge scents. Consider using a tall airtight container, tucking wax paper between cut slices to protect against exposure.
Are there flavor variations I could try?
Consider flavor additions through different frosting twists or extracts. Adding almond or pistachio flavor fans the nutty character, while a purple berry infusion for syrup blends new and exciting sensations.
Can this cake be made gluten-free, and what adjustments will there be?
Using a gluten-free flour mix with xanthan gum maintains texture integrity. Pay attention to any dry content variations as specific brands handle batters differently, so watch moisture and finish closely.
Will using lower-fat cream cheese change my frosting?
Yes, lower-fat substitutes are often less stable, leading to runnier results. It may be necessary to adjust sugar for texture retention or employ another thickening aspect to bolster icing firmness.
How can I tell if my cake is done without overcooking?
Rely on the toothpick test and visual edge-pull clues for readiness. Cool slightly in-pan before the cake’s final overturn, protecting layers while the texture firms beautifully for secure serving.
Does temperature affect food coloring results?
Absolutely. Aim for consistent temperature controls during mix and bake, as spikes or drastic drops influence chemical processes impacting vividness. Structured heat application ensures your hue stays bright and bakes evenly.
Additional Resources
Embark on exploring related recipes such as our Red Velvet Cupcakes or traditional Southern velvet cakes to deepen understanding of the velvet category. Discover technique guides like cream cheese frosting mastery or velvet batter mixing for professional cake results. Study ingredient information, focusing on cocoa powders and food color selections, enhancing confidence in choosing sustainable, high-quality options.
Seek seasonal variations that accompany fall baking flavors or new year celebrations, broadening your recipe horizons. Consider delving into equipment recommendations for item insights on mixers, pans, and spatulas best suited for velvet cake excellence.
Join the Conversation
Engage friends and the culinary community by sharing your cake experiences and photographs on social media platforms. Utilize hashtags and photo angles recommended by our community to echo our love for this vibrant dessert, or join our recipe review panel providing feedback to inspire continuous innovation.
Explore recipe variations with fellow bakers and inspire others through friendly exchanges of ideas, successful adaptations, and themed embellishments, nurturing creativity and skill advancement together.